Monday, April 18, 2016

Amiga Audio Issues - Part 3


So, the MC1488 chips have arrived. The one in the A500 is actually an MC1488N made by Texas Instruments whereas the ones I have here are MC1488P made by Motorola. There is no difference in the chips at all. In fact, my A500+ actually has an MC1488P.

MC1488P x 5

Having done a lot more reading I understand what the MC1488 is doing in this context. It is normally used in changing TTL voltages to RS232 voltages for serial communications. They contain four 'drivers', a driver being the conversion from TTL voltages to RS232. The MC1489 chip which sits above the MC1488 on the motherboard contains four 'receivers', which convert RS232 back to TTL voltages. In this particular instance, the first input appears is being used as a 'NOT' gate to change the 0v to 5(ish)v from the CIA into a more meaty +12v to -9v.

I won't go into any more detail, partly because it could become very technical but mostly because I don't fully understand it all. Suffice it to say that when the MC1488 has 0v on pin 2 there should be 12v on pin 3 and when there's 5v on pin 2 there should be -9v on pin 3. Given that my MC1488 has 12v - or thereabouts - on pin 3 no matter what the voltage on pin 2, this leads me to believe that there is an open circuit in the chip, hence, replace the chip. :)

So, tops off again chaps...

Unfortunately my phone camera failed miserably and didn't take pictures of the process of me getting the chip off the board. :(  Basically, it involved cutting through the legs on one side of the chip - carefully - then bending up the chip to make it easier to do the same to the other side. A few minutes later, with the help of some solder wick and a pair of good quality tweezers and the chip and it's legs are gone.

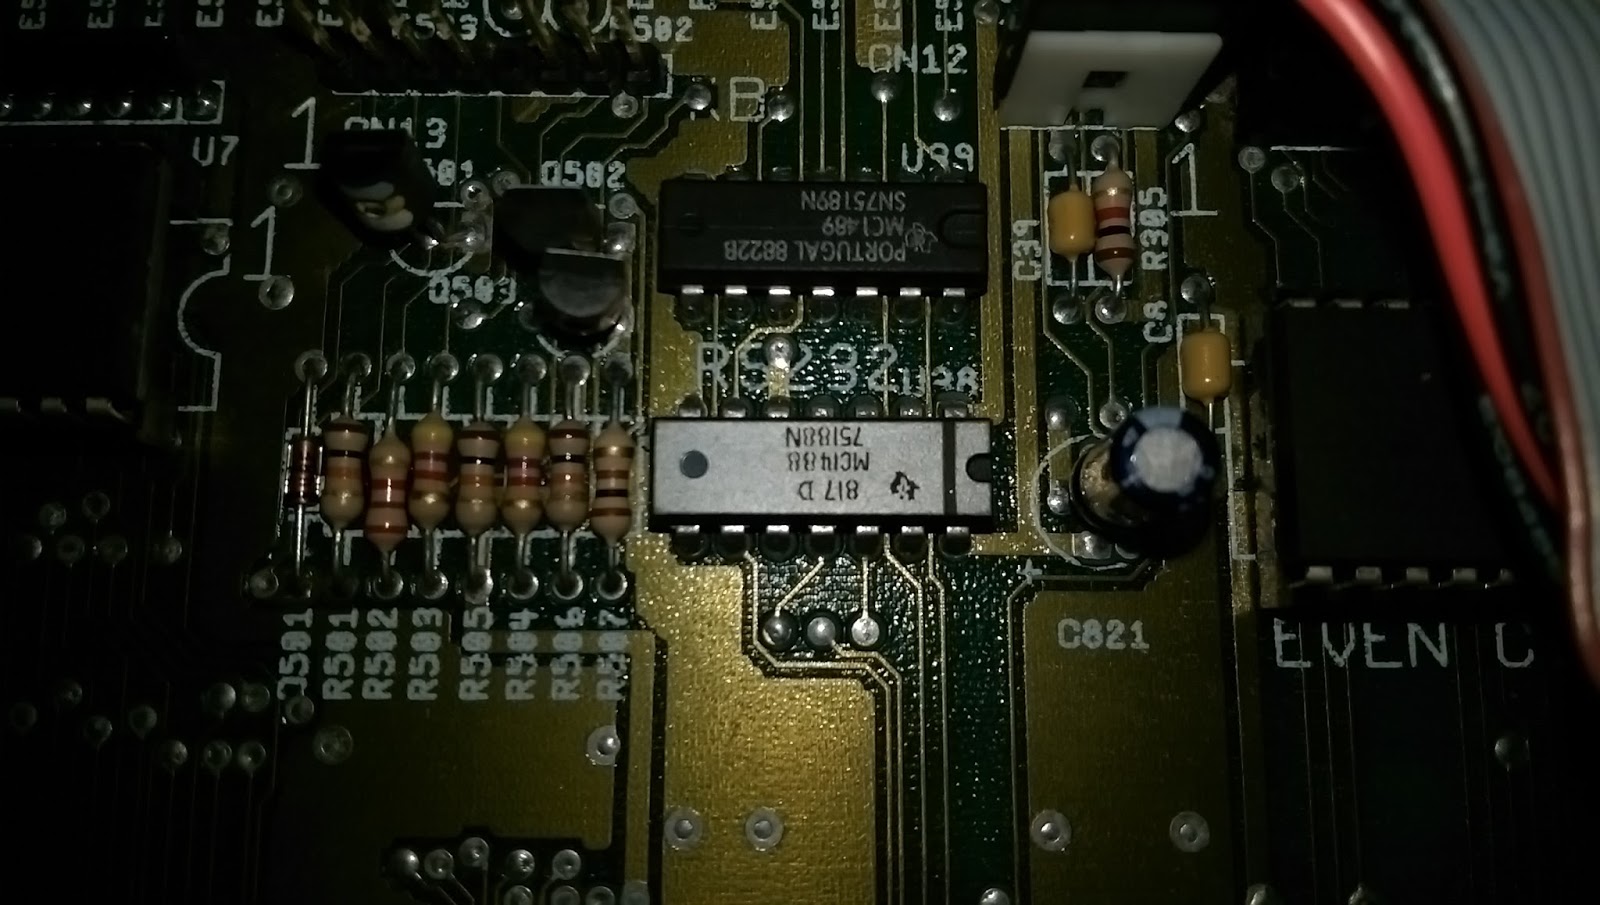
The dead MC1488 RS232 line driver chip

This chip was silver for some reason. It's the only time I've seen one like this. In my A500+ it's black and all of the pictures of the various A500 motherboards on the Big Book of Amiga Hardware website show it as black too. Maybe it was special? Either way, it's dead.

Awaiting pin removal

I cleaned the old solder off with solder wick and then cleaned the surface with isopropyl alcohol with some cotton buds. Finally, I used a bit more alcohol and an old toothbrush to make sure no debris or other junk was left nearby.

New MC1488P installed and ready for action

Once the chip was inserted it was a two minute job to solder the fourteen pins. Far easier than Agnus.. Once again, when I'd finished I cleaned the board with some isopropyl alcohol and cotton buds, followed by a final scrub with the toothbrush.

Let's get this sucker tested!

I plugged in the floppy drive, power cable, monochrome composite output (who wants to mess with an A520 at this point? Not me.) and audio out left and right to my PC speakers. The A500 booted without any problem but then guru'ed when I tried to run OctaMED. Like a numpty I had forgotten to put the 512kb expansion in too. OctaMED won't run in 512kb...

Testing - this time with 1Mb.
Take 2.

It worked flawlessly. The difference in sound is now quite distinct with a definite treble and white noise that wasn't there before. Switching the filter on restores the 'muffled' sound, just as intended. Another repair successfully completed. :)

Success! The filter is working!


Thursday, April 14, 2016

Amiga Audio Issues - Part 2 - A Diversion

So, while I was trying to diagnose the issue with the MC1488 I managed to drop the multimeter probes just before I finished and shorted something. The Amiga froze. No big deal. Just restart it. But it didn't restart, instead I was left looking at a dark grey screen.

Dodgy MC1488 Chip (the silver one)

Ah - Dark Grey Screen on Bootup
Don't panic! Stay calm!

No worries. Just pop the top off again, press all the chips into place (the ROM and Agnus made satisfying creaking noises - normally an indication that they're not in properly) and try again. This was the result:


ARRGHHH!!! PANIC!!! ARGHHHHH! I've killed it!!

After a stiff drink and a lie down I came back to it and tried to reason things out. The screen, although rolling, is definitely green. This normally indicates an issue with the chip RAM. That was, however, a bit unlikely since I had been nowhere near that part of the board and it would be a big coincidence that a RAM chip died at that very moment. But I had read somewhere that problems with Agnus could also, in some situations, cause a similar fault.

With a spare Agnus I managed to improve things slightly. But only slightly since I now had a solid bright green screen or random coloured pixels.

Our situation has not improved...
Maybe it was the chip RAM at fault. I had a RAM chip of the same type in my box so I placed it over each existing chip and turned on the Amiga to see if the green screen would go away. Sadly this made no difference.

Appeals to the Amiga group on Facebook (hi guys!) resulted in many suggestions but the one that kept cropping up was to re-seat Agnus. But there was no point since Agnus was as far into the socket as I could push her....(can you see where this is going?)

Out of curiosity, I removed Agnus and then pushed the chip into the socket but only just so the top of the chip was proud of the socket. Sure enough, the Amiga burst back into life. The socket was borked.

In this case, ebay is you friend. Four new sockets delivered for a couple of quid.


Cue montage of me sweating over a steaming motherboard, wiping my brow, looking at schematics, reaching for tools, slurping tea etc. Pictures of my removing the socket are not included to protect the sensitive..

Socket Removed
New Socket Inserted 
Chips Re-installed
If you have a go at this type of repair, and if I can do it then anyone can, here's a couple of tips. Firstly, get yourself some de-soldering braid and a de-solder pump. I had the braid but not the pump so to get the old solder out of the holes for the socket I had to use a pin. Using the soldering iron I melted the solder and pushed the pin through the hole. The solder got dragged through the hole by the pin then cooled down, to be removed with a quick wipe of the iron. 84 times. Get yourself a de-soldering pump. Do it. NOW.

With a new socket, both of the Agnus chips I have now work without any issues so this socket repair is done. :)

Repaired and fully operational.


Friday, April 08, 2016

Amiga Audio Issues

A little while ago I bought an Amiga A500. After having lots of fun cleaning it up and putting in a new ROM (Kickstart 2.04) I tested it thoroughly by playing...er...I mean running the demo of Frontier Elite II. I also played lots of music through OctaMED.

It was during the music that I noticed something a bit off. The audio sounded OK but was a bit muffled. It then occurred to me that the Amiga's audio filter was switched on. But according to OctaMED it wasn't.

For the uninitiated, the Amiga has a hardware low pass audio filter built in which can be controlled by software. It was, allegedly, included by Commodore to improve the sound of sampled audio which was quite low quality (compared to today - in those days it was awesome!). Basically, if you turn the filter on it effectively hides some of the artefacts or 'graininess' of the sampled sounds. In most uses it's turned off and this is indicated by the Amiga by dimming the power led a bit.

So, in OctaMED I tried turning the filter on and off an noticed that it made no difference to the sound of the audio, even though the LED dimmed like it should. Fortunately, RetroGameModz on youtube has a whole 50 minute video on troubleshooting the audio filter. It's worth a look if you are into your Amiga hardware (probably give it a miss if not..). Find it here. Time to get that top off..


Amiga Audio Testing Studio - also known as my desk.

To cut a long story short I followed the advice given in the video and found that the chip U38 looks like it's having 'issues'. When the filter is on then the voltage at pin 2 of the chip should be around 0 volts and at pin 3 should be about 12 volts. This is pretty much what I get give or take a tenth of a volt.  With the filter off the voltage at pin 2 should be near 5 volts and the voltage at pin 3 should be -9 volts or so. In my case though, the voltage at pin 2 is about 6 volts but at pin 3 there is still 12 volts (11.85 to be precise). This is, as they say, a bit of a problem.

Voltage at U38 Pin 2 - Filter On
Voltage at U38 Pin 2 - Filter Off

Voltage at U38 Pin 3 - Filter On (Correct)
Voltage at U38 Pin 3 - Filter Off (Argh! Incorrect. Should be -9v)
I don't pretend to fully understand the circuit but, in simple terms, by having 12 volts from pin 3 of U38 then the transistor Q301 has 12v at the base and at the emitter, meaning that the transistor is off. Because of this, the other side of the circuit has -12v since there is nothing to pull up the voltage. This results in -7v (ish) at the gates of two JFETs resulting both JFETs being 'cut-off' so current is forced to take the path through the low pass filter.

Audio Filter Schematic (part)

I've also tested this on a known working A500 (it's an A500+ actually but the circuit is the same) and the voltage results I get from this more closely match those on the YouTube video since the MC1488 chip is behaving as it should.

So. Is it worth replacing the chip? Probably. They're about 40p from Farnell so it's not like they are obsolete or difficult to get like the A1200 video DAC for example. The only danger is that I damage the board as I try to remove the chip, bearing in mind that these boards are over 25 years old. This particular motherboard is marked as being made in 1989 so he's actually 27!

Old

I do have a concern that the switching voltage at pin 2 of U38 seems a bit high at 6v. I traced it back to the CIA and it all seems OK.

CIA (Odd) - _LED Comes from Pin 3

I suppose it could just be a variation of the components and the different motherboard designs or even possibly a symptom of the faulty MC1488  - although it is a simple single input device. I have a few spare CIAs so I might put one of those in just to verify that the voltage is the same no matter what. Looks like an order to Farnell is also on the cards.

To be continued...