Saturday, January 21, 2017

Apple Mac Classic II Repair - Part 5 - And Finally...

A lot to get through in this final part! First, I'll have a look at the printers. They're both the same model (Stylewriter II) which, as I mentioned in the first part, are basically re-badged Canon printers. There are no power cables but they take standard 'kettle' leads so a quick visit to Wilko will sort that out. They do have the proprietary Apple ADB cables which is good. This means that, obviously, these printers were only intended to work on Apple Macs with ADB ports.

A Brace of Printers


Only one has a cartridge installed and it is actually an Apple branded cartridge so I have a bit of a suspicion it may have potentially dried out. :)

First thing to do is find the 'test page' facility. As there is only one button on both of them, it's a case of working out whether it's a long press of the button while it's 'on' or a long press while it's 'off'. I can save any mystery. It's a long press while it's off. It then turns on and if you keep holding it for about 5 seconds it attempts to print a page of something.

Unsurprisingly, the cartridge didn't work. But, as there is a cartridge installed at least I have a good guide as to what the cartridge should look like. Some googling shows that they should take the Canon BC-02 cartridge and, sure enough, pictures of this cartridge match the one I have.

Incidentally, both printers appear to be working as expected for quite lightweight inkjet printers. Paper feeding seemed a bit of an issue on one of them but I suspect a bit of cleaning is all that is needed on the rollers etc to get rid of years of built up paper dust and other crap.

A few days later and a small parcel drops through the door containing a BC-02 Canon cartridge. What a coincidence!

BC-02 Installed
The first printer (the one that has no yellowing at all) didn't want to print anything. The head moved but no ink hit the page. Bugger. The second printer, which does have some yellowing, actually worked and printed its test page! Yay! Such a shame that the other one didn't work. BUT. The way these cartridges work is that they connect to a bunch of contacts on the printer cartridge carriage (which is fairly ubiquitous these days). The contacts looked a bit grubby so after a wipe with some isopropyl alcohol I tried again. Success! Both printers work! Double yay!

A Brace of Test Pages
Next, the keyboard. Unfortunately, the cables that came with the Mac didn't include a keyboard cable. I assumed (as did the seller probably) that one of the cables in the box would fit the keyboard but of the two that I have, they are both printer cables. I was a bit worried about this as the ADB cables for keyboards seem to be very rare and, therefore, expensive. Then, while googling for the cable pinouts, thinking I might have to make one myself, I stumbled across a statement on a random Mac forum. In a nutshell, the keyboard ADB cable is identical to an S-VHS cable... The only difference is that there is no Apple logo on an S-VHS cable! And these are still easily available and dirt cheap (£2 from ebay). Oh, look. There's another parcel dropped through the door containing a generic S-VHS cable.

Black instead of grey - never mind

Keyboard connects and works flawlessly. :)

The keyboard itself is pretty good quality. It needs a good clean and I'm hoping that the keys just 'pop' off like most other keyboards of that era. The adjustable feet are not broken either which is a bit of a rarity.

Next, microphones. There are two Apple microphones in the box. These actually use a standard 3.5mm jack rather than any proprietary Apple connector (makes a change) and both look unused. As this Mac has a single voice sound I'm not too sure what value these would have been in its heyday. There are two though so one can probably head back to ebay at some point. ;)

A Brace of Microphones

Finally, the mouse. As any Mac users reading this will know, it's a single button mouse, slightly square and a bit small by most standards. But it is well built and looks pretty sturdy. It does need a good clean though. I will probably take the case off and give a soapy bath and a wash using an old toothbrush.

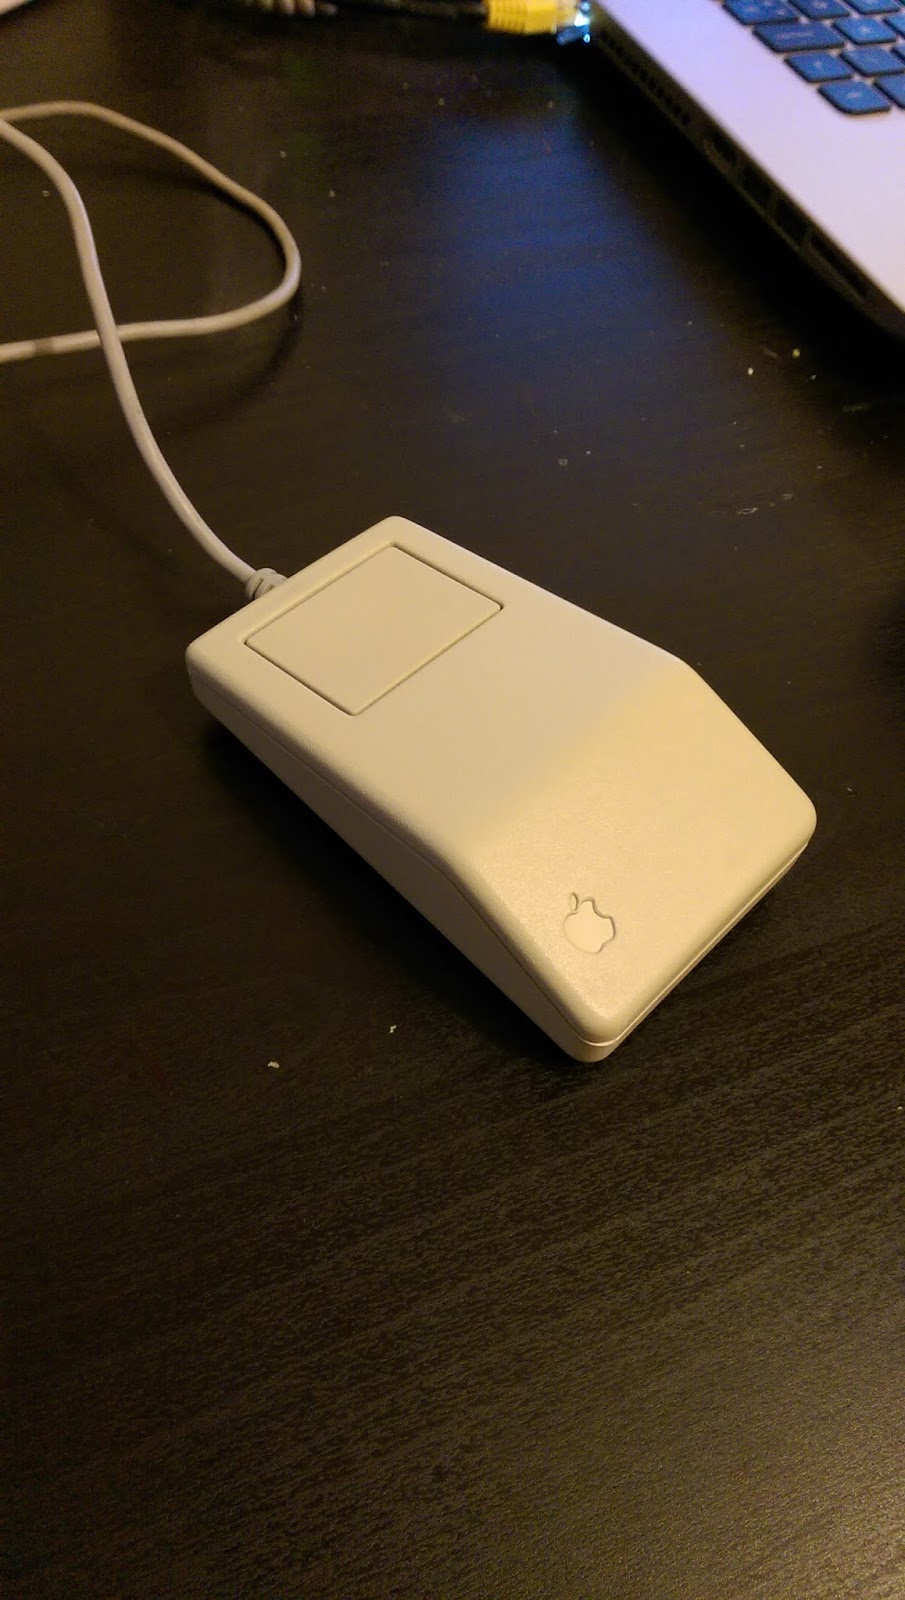
Mouse (excuse my dust)

Now the meaty bit. Capacitors...

I won't go into too much detail on this as lots has been said before about replacing SMD type electrolytic capacitors. Obviously, the first thing is to remove them but, given the level of leakage was not as easy as expected. Even with two soldering irons and extra solder applied, it just proved impossible even with the ones out in the open. Several of the caps are very close to connectors or other delicate components. So I did something I never thought I would. I cut them off.

By using my cutters and lining up with the pads on the board, I was able to cut off the capacitors quite easily. This way is NOT recommended and I was relying on the motherboard being of a fairly decent quality. It was a major gamble, but it paid off. No lifted pads at all. No damaged pads, or other connectors. Phew!

Here's what was underneath each capacitor:

C79 Looking a bit messy

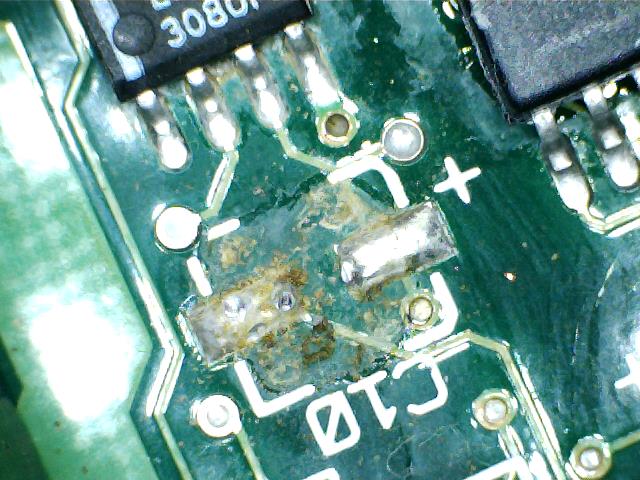
Not as bad as C10 though..
And here's some of the debris:
Dead caps. Bad caps! Bad caps!
After a bit of a cleanup here's what the pads should look like:

Ooooh, shiny.

Then it was just a case of soldering in each of the capacitors. I did this by adding a tiny bit of solder to one pad, placing the capacitor on the pad (with the correct polarity of course) and then hitting the pad with the soldering iron. This gave enough grip to solder the other side properly and then come back and tidy up this side if needed. It worked out OK:

C79 replaced

C10 replaced (with added cotton bud fibres)
There were 17 capacitors in total and I was fortunate that no pads lifted or had been too badly corroded by the leaky electrolyte. The new caps should last a good few years now. :)

Next question, did I break it by installing new caps?

Nope. In fact, the sound now works too! :)

Phew! It still works.

All set up and ready.

And that's it for this Mac. It works, the printers both work, everything now works. Mission accomplished.


For JB.


Friday, January 20, 2017

Apple Mac Classic II - Part 4 - Disk Swap Hell

Disk swapping. Anyone who ever owned an Amiga or Atari ST will remember the pain of swapping disks. We only had standard density drives (837kb or 880kb on Amiga) so there was a lot of it. Or so I thought.

The Mac does not have a working hard disk so everything is done on floppy disks. And I mean, EVERYTHING. Never have so few swapped so many disks for so little result. Even ejecting a disk results in it requesting the same disk back again because it needs to know what to do after it has ejected a disk.

Typically, trying to view the contents of another floppy after booting from a system floppy will result in 15-20 swaps. Yes, really. This Mac MUST get a working hard disk.

Fortunately I have some spare SCSI hard disks in my box of bits. They're more modern than the broken 40Mb drive and a bit bigger (9Gb or 36Gb). But there's a problem. The software I have on the tools disk will only 'see' apple supplied hard disks. This was, in true apple style, to get you to buy their drives. No problem. I shall download alternative software. Except it's not as simple as that.
Programs for early Macs can be downloaded in a variety of formats. Most include some form of compression (StuffIt or similar) but the way they handle data is completely different to PC disks. So I can download the program but there's no easy way to copy it to a Mac floppy. I tried copying one to a PC floppy then copying the file to the system disk and running it there. After about 50 disk swaps (I shit yee not) it copied OK only for the Mac to say it couldn't read the file.

I tried a flaky program that converts files as it copies them to a Mac floppy. This required me to format a Mac floppy. Disk swap hell again....but at least the program seemed to transfer successfully on my PC to the Mac formatted disk.

More disk swap nightmares. Only to be told that the file couldn't be opened. Rinse. Repeat.

I was on the verge of giving up until I found a program that, when copied using the flaky app to convert files to Mac format, had a more sensible file name. It ended with .sea or Self Extracting Appplication. This was promising. I put the disk in the Mac (cue more disk swaps) and then then ran the program. More disk swaps. Then a window appeared asking where to install the program. There was no choice, it had to install back to the system floppy disk. More disk swaps. Then a message the disk is full. I was short by 33Kb. My home address is longer than 33Kb.

This time, the Mac came close to becoming airborne. 

After a lie down I began to google again and found that Apple's software could be patched to allow it to look at any SCSI drive. I duly downloaded the software, copied it to a Mac formatted floppy. It worked! It fitted on a bare bones boot disk with a couple of hundred Kb to spare. Now to get the patch.

This was another long and tedious session of downloading one file, finding it was in .sit format (a whole other ballache - some StuffIt archives don't work with newer versions, most don't seem to bloody work at all) then rejecting it. Finally, one chap had a webpage where I copied the text from the page, renamed it to .hqx (don't ask) and then copied it to the Mac floppy. Miracle of miracles, it worked and I had a .sea app sat on the floppy. 

Into the Mac, more disk swapping. Open the disk, more disk swapping. Run the patch file, more disk swapping. More disk swapping. And some more. Even more. By this point I thought Steve Jobs was having a laugh from beyond the grave. Then, it happened. "Patch successfully applied." Get in!

So, to re-cap. Mac Classic II software is a nightmare. It is a complete pain in the arse from start to finish. 

Anyway. I have 36Gb drives and 9Gb drives. I connected up a 36Gb drive and started up on my patched system disk. Success! The software recognised the drive and began to format it.

Finally! An end to disk swapping!

It took about three hours in total to format, then verify the format of the drive. One thing I noticed that I wasn't too keen on was that the hard drive got rather warm. In fact, it was almost too hot to touch. I'm not sure if this means the drive is faulty or if that would be its natural 'state'. Either way, it was too hot to go into the case of the Mac.

Fortunately, I also had the 9Gb drive from HP. I swapped everything over, waited about an hour and this drive was done and was also considerably cooler. Nice one. In she goes. :)

First problem. Setting up the partitions I set the first one to 4Gb and then tried to install the OS. Ooops. This was obviously too big as it complained I had -3177783Mb free on my hard disk which was clearly insufficient to install the few megabytes of System 7.0.1.

Re-partition to 2Gb and try again. This time, no complaints and within half an hour I was staring at a hard disk installed version with NO DISK SWAPS! YYYYEEEEESSSSS!!!

Now all I need to do is install some more useful things....


Sunday, January 15, 2017

Apple Mac Classic II Repair - Part 3 - Disaster

In the process of trying to get this Mac up and running it's been essential to be able to write floppy disk images. As I mentioned previously, I have a USB floppy drive which is great and just works.

BUT, disaster befell my laptop today. I turned it on. And got nothing. Just a terse message about there being no boot disk detected. O. M. G.

All of the partition information on the drive had gone. Just gone. To cut a long story short I ended up having to re-install windows. What the hell happened?

In the process of re-installing windows, I decided to get back to writing another floppy for the Mac which included a bootable version the hard drive tools but patched to allow me to format any SCSI drive. For this I borrowed my son's laptop. It's recently been re-formatted and so had virtually nothing on it. Good job really...

To write the floppy disks I'd been using WinImage. So I re-installed WinImage and proceeded to try to write a disk image to the floppy drive. I got an error message. This was odd. I'd previously used something to write the Mac floppies so something must've gone wrong somewhere. I headed to the WinImage webpages and found a lot of comments about issues with writing to USB floppy drives. As I read down the comments a rather large feeling of dread crept over me. Many users were complaining that writing USB floppies had wiped their hard disks. And that they didn't even realise until they re-started. OH. SHIT.

I restarted my son's laptop. "NO BOOT DISK."

It appears that the program WinImage has some difficulty distinguishing between 'A' and 'C' drives which, I think very simply is down to changes in Windows because, well, floppies. No-one uses them now...

So now I understood the reason for the sudden apparent hard disk failure. Basically, the program had dutifully written 1.44Mb over the first few sectors of my 930Gb hard disk, wiping out the partition information and any hope of getting my data back. I then, very carefully, repeated the escapade on my son's laptop.

I still couldn't understand how I had written the Mac disks though. Then I remembered that I had the error with WinImage at my first attempt so went and found another app called Rawrite for Windows which DID work. All this, of course, took place before I restarted my laptop...

A warning. DO NOT USE WINIMAGE FOR FLOPPY DISKS. YOU WILL FEEL SAD AFTERWARDS. Note that it works great for SD cards etc. Just DONT use it for floppy disks.

My laptop is recovering slowly as I remember what I had installed and re-install stuff. Most of my family photo's are uploaded to DropBox (I learned THAT lesson a few years ago) but there's a lot of stuff which I will never get back.

Thursday, January 12, 2017

Apple Mac Classic II Repair - Part 2

So after a lot of cleaning, the Mac still refuses to boot and gives us the stripes of death. What to do. I have capacitors on order (for the grand sum of about £3.50) but I was worried that, even after replacing the caps, I might still have the same issue. The stripes are not caused by a failure of the capacitors, rather, the electrolyte leaking out of the capacitors and short circuiting various parts of the motherboard.

Stripey..

A lot of Googling has shown that in many cases, the extreme measure of putting the main board in the dishwasher has cured many problems such as the one I have with this Mac. I would normally dismiss this type of idea as being completely insane but so many different sites suggested it as an extreme, but practical solution I thought I might give it a try.

Brace yourself...
Yes, I put my vintage Apple Mac motherboard in the DISHWASHER.

I set it going early this morning on a cool wash (normally reserved for delicate cups and glasses) and then, after 20 minutes, put it in a warm cupboard - where my boiler sits - and left it to dry out for the rest of the day.

Fast forward to 8pm tonight (Thursday 12th January) and it's time to put it back in the case and see if I've destroyed it...

It's Alive!

Nope. It boots. I am STUNNED. Sticking it in the dishwasher and then letting it dry out for 12 hours actually worked!

For anyone who might want to try this, bear in mind that I removed the battery (it's dead anyway), the ROMs (two chips - some Classic II's have four apparently) and the additional RAM before it went for a bath.

But we do have a problem. Notice that there is a floppy disk icon with a question mark in it? That means it can't see the hard disk or, at the very least, there's no operating system to boot from on it. Now I need to get some system disks. This was relatively easy but as the copyright around this is a bit vague I will say no more.

Incidentally, there was a floppy disk stuck in the drive. I hadn't spotted that there was a hole next to the slot for the disks which, on the Mac, acts exactly like the little hole in the CD tray for when you can't get your CD out of CD draw. One unfolded paper clip and a hefty shove later and the disk was released. Whether it was left in there because the machine went faulty or whether it was left in there by accident and then it was sold or abandoned I don't know. Either way, I got it out.

Talking of floppies, my excellent Dad gave me a USB floppy drive over Christmas, and it has been THE most useful thing ever for this project. I managed to write a 'Disk Tools' disk from System 7 and booted from that. I also managed to write all the other System 7 disks too which will be very useful.

Welcome indeed!
Once up and running I ran the disk setup utility and asked it to scan the SCSI bus for a hard disk. This was the result:

Bugger.
Oh dear. It looks like the hard disk has gone kaput. Hardly surprising, given its age. The only snag is that I think the only SCSI drives I have are about 36Gb and I'm not sure that this Mac would cope with that... More Googling required to see if I can use them - assuming I can find them in the box of bits upstairs!

I should point out that I managed to do all this without the keyboard attached. The cable I've ordered (for £2 - big spender) hasn't arrived yet but the mouse can plug straight into the back without needing the keyboard.

One final thing in this post. Although he's up and about, it doesn't mean that this is the end of the repair, and he's not out of the woods yet. The capacitors on that board are toast. The amount of electrolyte that was on the board can only mean that the problem WILL re-appear. So I am going to replace the capacitors anyway to ensure that this machine keeps going for another 20 years.

Apple Macintosh Classic II - Part 1

Any of my regular readers (I know you're out there, I can hear you breathing) will realise that I have a bit of a bias towards certain early 90's home computers. Specifically, the Commodore Amiga. Any Amiga is a computer worth saving, whether it's painted in bright red gloss paint or destroyed by battery acid, twice. I've done my utmost over the years to save and release into the wild any Amiga that I can a) afford and b) repair. So far, I've managed to fix anything that I've come across including the capacitors on my Amiga A1200 which actually started out as an exercise in trying to make the case white again.

But now, I have turned to the 'dark side'. I have bought an Apple Macintosh. An Apple Macintosh Classic II to be more precise. This particular model replaced the Mac SE/30 and was, rather bizarrely, less powerful than the SE/30, had no expansion slot, used a 16-bit data bus with a 32 bit CPU, could only address 10Mb of RAM and had only single channel sound. Who said Commodore had exclusive rights to ridiculous management decisions?

Anyway, this Mac was bought from a very nice chap in Worcester and it also came with two Apple Stylewriter printers (one still boxed!). The Mac itself suffers from the classic issue of vertical lines on the display. I am hoping that this will be down to leaky capacitors (sound familiar?) and will be a relatively straightforward fix. Worst case would be that the rechargeable battery has leaked over the motherboard (also sounds familiar).

The first nice surprise was to find out that the printers are basically re-badged Canon (BJC-200?) and you can still get ink cartridges too! Also, because of the Canon technology, when the ink is replaced, so is the print head, so even with the age of these things they should still work perfectly, if a bit slow by today's standards.

First, a few pics of the unit:

In all his glory
That doesn't look like System 7 to me...
The vertical stripes are, as I said, a classic sign of leaking/broken capacitors. I might be able to cure this just by cleaning the main board but it may be that the caps will be too far gone and need replacement.
Danger! Danger! High voltage!
Taking the back off and this looks pretty clean inside. There's no issues with the CRT otherwise we wouldn't see the vertical stripes. There is some damage to bottom corner of the case but it is very minor although I did also notice that one side of the case doesn't fit correctly. I suspect that this poor Mac has been dropped at some point in it's history.

The business end of the high voltage
Under that insulation cap is the main anode (not cathode like I said before) for the tube. That is something that I DON'T want to touch. It's very well insulated though, as is all of the HV stuff so I should be relatively safe playing with the insides. Notice that it's disconnected from the mains while the cover is off. Mains will NOT be applied unless the cover is on. To quote from Ghostbusters: "I don't want my face burned off.."

Hard disk with floppy drive underneath (still containing a floppy disk!)
There is a hard disk here which, if it's the original should be either 40Mb or 80Mb. Yes, megabytes.

The main board
After a bit of cable disconnecting and a little persuasion, the main board came out and, on first sight, doesn't look too bad. There is a battery that hasn't leaked (phew!) but I haven't checked it yet to see if there is any sign of life. I doubt there will be but these batteries are easily available from ebay etc.

Extra memory - cool
The main board has two 30pin SIMMs installed. I think that they are 2Mb each taking this Mac to 6Mb. I'm not sure though and need to check. If I'm really lucky they will be 4Mb each taking it to the maximum 10Mb (Nope - they're 1Mb each making a total of 4Mb. Oh well.).

A closer look at the main board shows that the capacitors in this are bad, with a capital "fetch me the PCB cleaner and a gallon of cotton buds..." as you can see below.


Even where there is no leakage, it's obvious from the corrosion on the capacitor's solder pads that something is very clearly wrong. They should be bright and shiny, even after 25 years but they are showing a lot of corrosion. I can try and clean the board but I suspect the caps have had it.

(Cue montage of me getting cotton buds - lots of them - and IPA and then spending over an hour cleaning, wiping, sweating, more cleaning etc)

Alas, I was correct. Cleaning the board made no difference. Virtually no difference. Those vertical lines that you can see in the first picture are actually quite bright but this only happened one time out of about seven. All the other times the lines were still there but the stripes were much dimmer. Now, after cleaning the board, the stripes are bright every time. Is that good? Maybe, maybe not.

New capacitors are on the way from RS Components and should be here Friday. Until then, he will just have to sit on my desk and look cool..