As part of the pick-up I recently made, there was an Amiga A2000. This was the primary reason for the trip and was the first item offered which I gladly accepted. Everything else was a bonus - but more on that in another post.
The Amiga A2000 is a 'big box' Amiga and it is an accurate description. These things are bloody HUGE! I had expected it to be a fairly typical desktop PC size from the early 90's. How wrong I was. The main case is probably one and a half times the width and height of the Olivetti PC my brother had in the early 90's.
.jpg) |
| (Stock image from Wikipedia) |
This particular A2000 came with a CD-ROM drive, two floppy drives, a memory expansion (size unknown but suspected to be 2MB), IDE controller card and a hard disk. I don't think I will use the hard disk since the Buddha IDE card immediately gives access to the use of CF card adaptors* such as those used in the A1200 and A600. Even though the CF card adaptors use a smaller pitch connector I just so happen to have an adaptor that I salvaged from an A1200 many years ago. Hoarding works. :)
*foreshadowing - CFs don't play well with Buddha
Anyway, this machine, as with everything picked up, has been in storage for a very, very long time and is in need of an initial clean before any serious work can take place. But before even that, you know what we need to do.... Get that battery out!
 |
| I see, you little git. |
Once that was snipped out I could carry on and see what damage would have to be dealt with. I've done lots of A500+ in a similar condition but with the size of the board in this machine, anything could be affected.
 |
| Clip for the 2Mb MegaChip expansion. Nice! |
 |
| Top removed - fat gut for scale |
With the top off the scale of the motherboard becomes apparent. Again, it's massive! Far bigger than the A500 boards I'm used to. The majority of the real estate seems to be on the left side with all the Zorro II and PC slots. And don't forget that massive power supply.
Side note - I did not attempt to switch this machine for some time yet. The reason will become clear.
After marvelling at the size of the board and case I also had a look at the keyboard. Sadly, it is missing one key. BUT, if you're a long time reader of this blog you will know I have a thing about the different types of keyboards that Commodore used for the Amiga. Well, it just so happens that this one is a real chunk of unobtanium. Firstly, it uses real Cherry MX key switches (on the cheapest, thinnest PCB imaginable - thanks Commodore). Second, you'll see from the pictures that the keyboard has two 'A' Amiga keys. They are both red. Finally, the LED for caps lock is a rectangle at the bottom centre of the key rather than a circle at the top right of the key. All this means - apparently - that this is the earliest of early keyboards and is probably worth as much as the rest of the machine just on its own.
Having been in storage the keyboard needed a bloody good clean but was really simple to do. The unit itself is held together by clips (no screws here - they'd cost too much money - thanks again Commodore). This means it was relatively easy to get apart although I was nervous about breaking the clips, this plastic is probably 30 years old after all. The keycaps were very easy to remove too and only needed a gentle nudge from the back to pop off. I suspect that's how the missing key got lost but it does look like I could get a modern blank key that will be compatible with the keyswitch or even 3D print my own.
 |
| Clean-up started - note the red 'Amiga' key.. |
 |
| Tea required.. |
Following the usual wash of keys, brush off of dust and clean with wipes, the keyboard went back together without too much trouble. One support post had broken off and was rattling around inside but a touch of super glue put that back into place.
Finally, I popped it out into the sun for a light touch of 'light-brighting'. Not sure it made any difference but there you go.
 |
Enjoying the sun - with guest appearance by
an A1200 case |
One thing I found is that the keyboard case halves are slightly bent, almost certainly due to being in storage for so long. Not a problem in itself and it's happened because Commodore cheaped out and did not use screws in the two parts of the case. Where the clips lock into place there is enough room for the halves to bend but remain attached to each other. My efforts above with the weights on each end were to try and correct that - it didn't really do much. All I need to do is put the right thickness of feet on each side and it will be fine. :)
Back to the main board.
First thing to do was to remove the damaged CPU and Agnus sockets. This was fairly straightforward and, on first inspection, there didn't appear to be too much damage around the CPU pins which was a surprise (foreshadowing...). The Agnus socket just needed replacing and there was no damage to the board from the battery in this area.
 |
| CPU & Agnus sockets removed |
 |
| Insert new socket here... |
Looking over the board around the CPU I spotted a via that looked to be in particularly bad shape. After a quick run over with the iron and some flux it disintegrated... Arse. Still, I have a handy reel of wire wrap wire which is the perfect size for repairing this sort of damaged. The wire has a thick (relative to the wire thickness) coating. Note that, as this particular type of wire will be important later...
 |
| Via repaired. Others are OK(ish). |
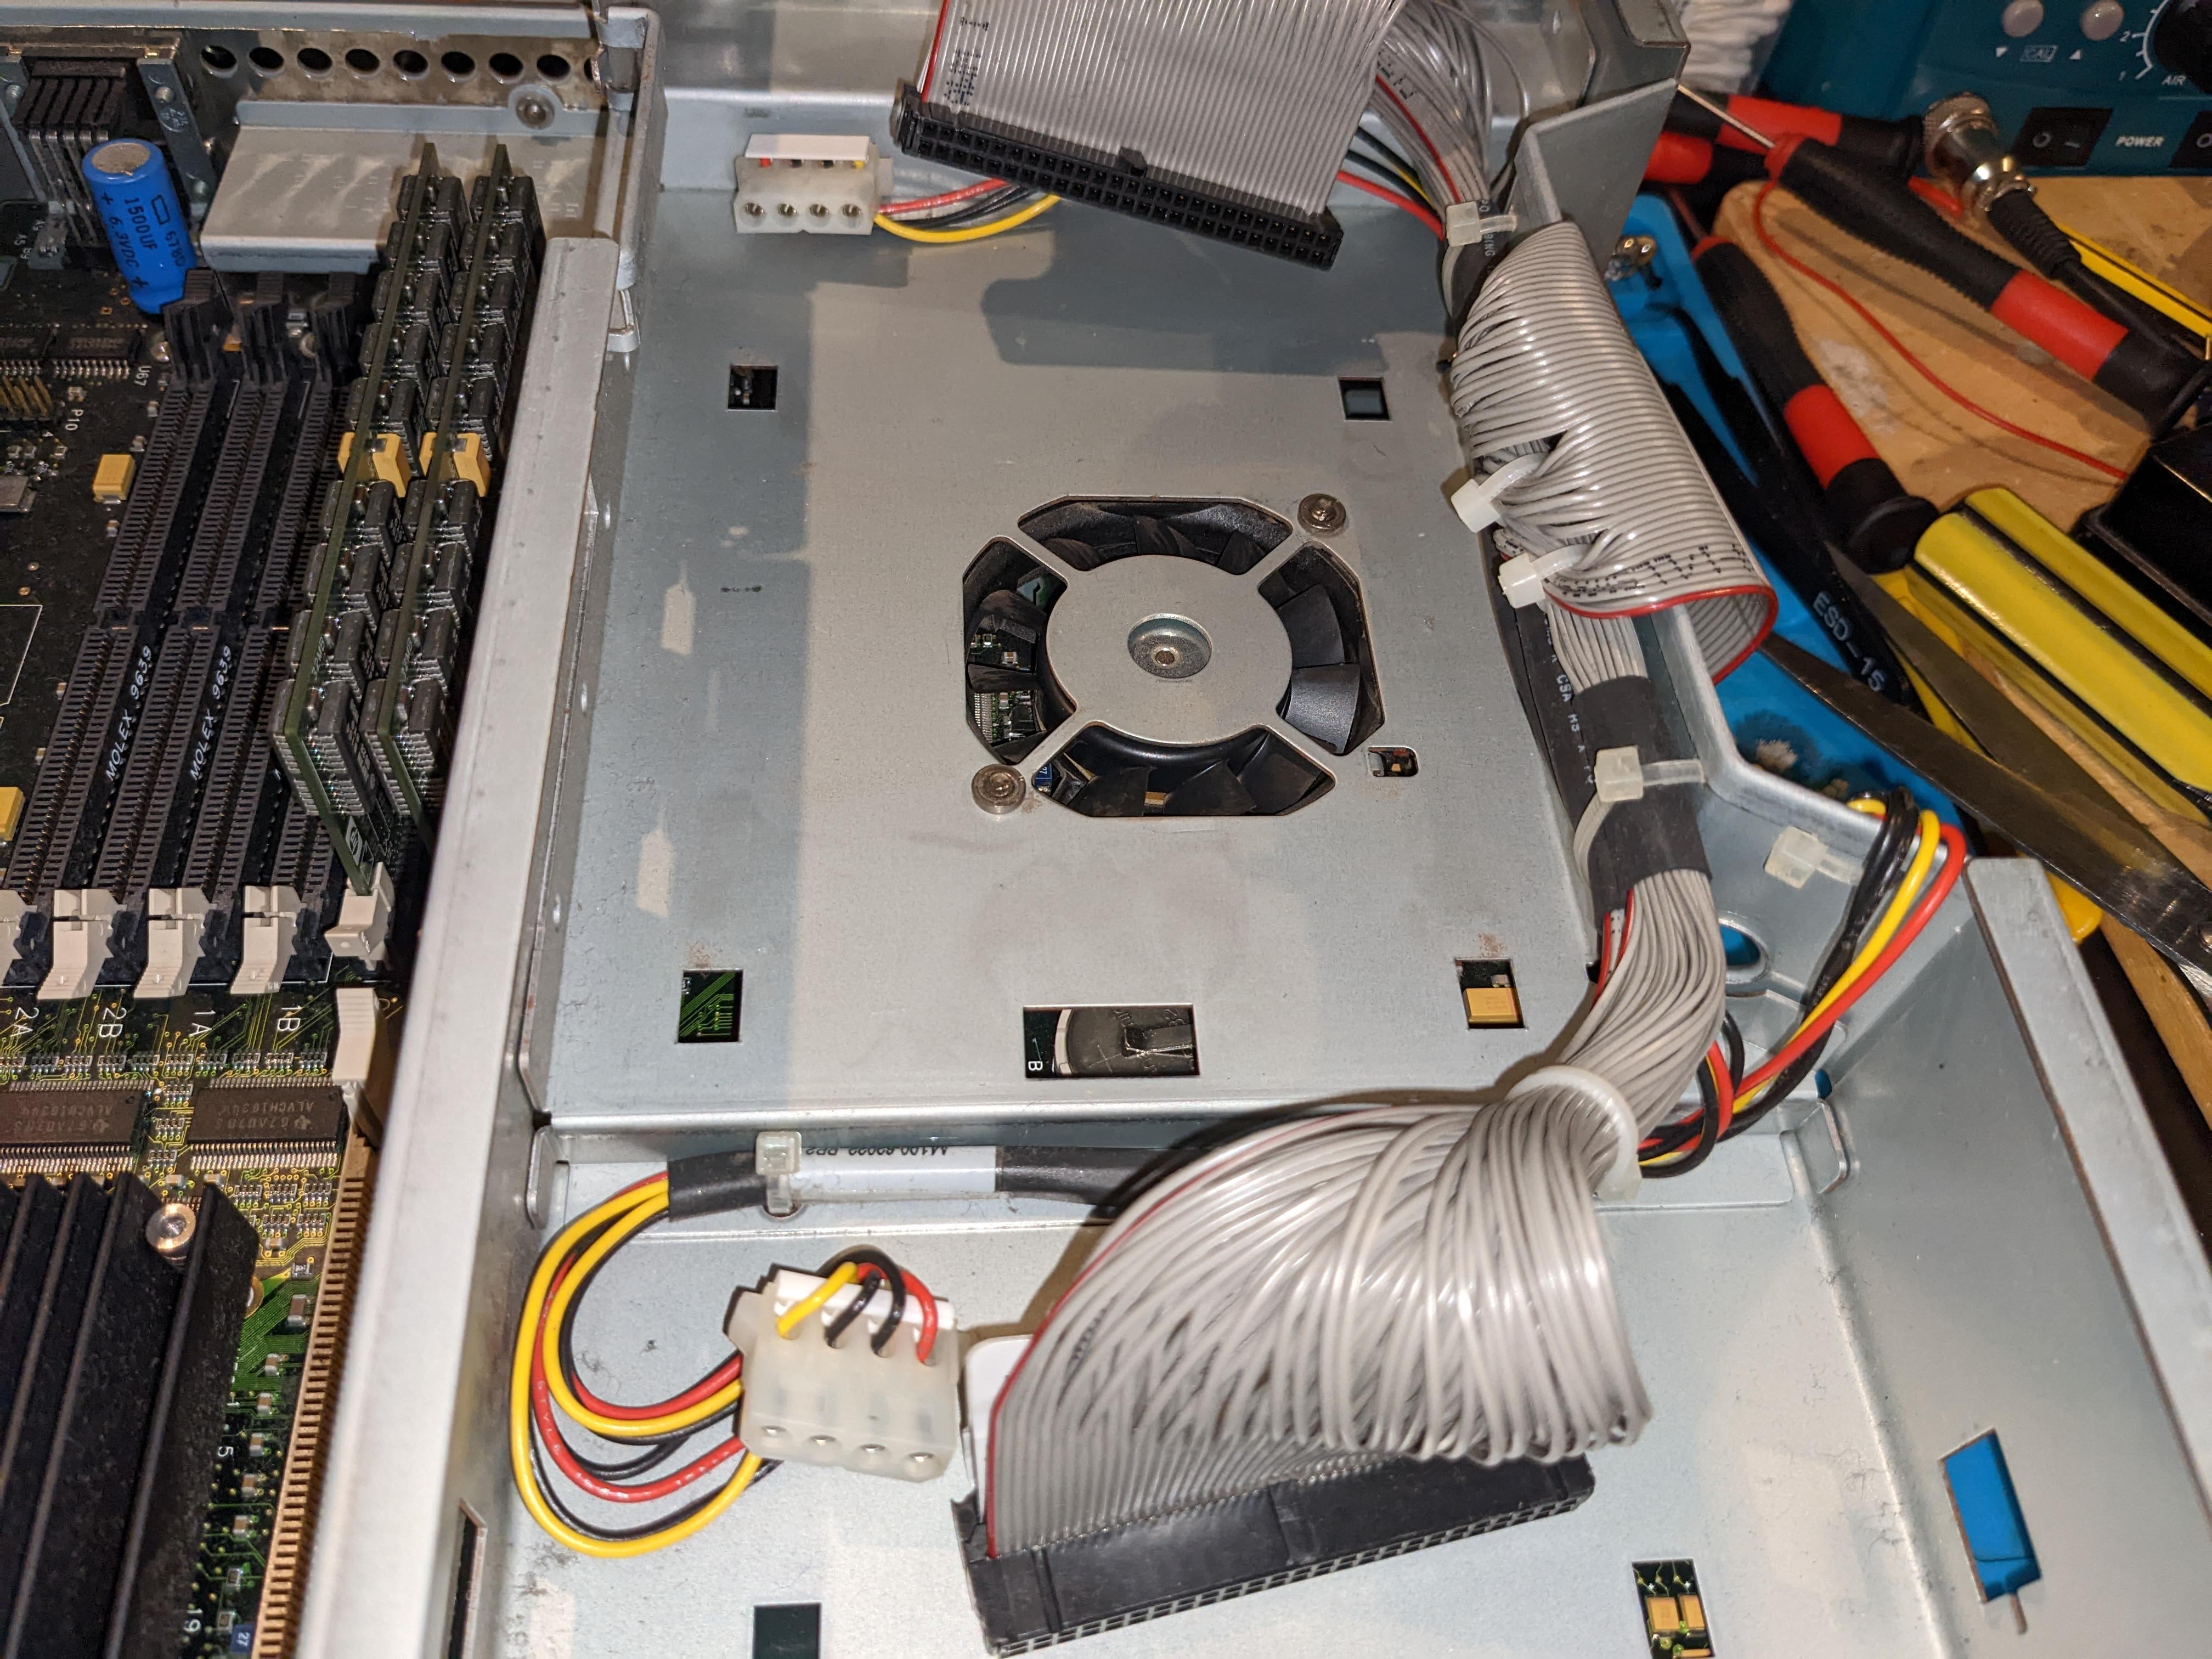
Next thing, the power supply. This is more akin to a PC power supply and has a large connector to attach to the motherboard along with multiple plugs attached to another cable for the hard disk, CD-ROM etc. I had no intention of just plugging this in. Given the length of time this has been in storage it's entirely feasible that the caps may have leaked or degraded past the point of no return. This sort of thing could lead to unfortunate voltages frying the board.
After another bit of a clean up, the removed power supply was plugged in for an initial smoke test.
No smoke. Nice.
Next up, the voltage test.
No so nice. The 5v lines were happily pumping out 7v. The 12v line could barely manage 9v and the -12v was around +4v. This is not a happy power supply. If I'd plugged this into the mainboard and switched it on there is every chance I would have killed the board completely.
I'm not a power supply expert so this one is, basically, headed for the bin. I have an old PC power supply which should suffice, although it is a totally different size and shape. A problem for another day.
 |
| Power supply innards - but faulty. Boo! |
 |
| The only thing salvaged... |
First thing to do with the old PC supply is splice the Amiga motherboard connector on to it. I should point out that the old ATX connector had already been removed as the supply had been intended for another, long forgotten, purpose. Anyway, the colours between the ATX and Amiga supplies do not match at all. On the Amiga cable, yellow is 5v, blue is Ground, orange is 12v etc, whereas on the ATX red is 5v, yellow is 12v (remember that one!!), black is Ground and so on.
More useful information on this can be found on various websites such as
here or
here. After the splice I carefully checked, then double checked, then triple checked I would get the correct voltages out of the supply and at the motherboard.
So, the first big switch on. What did we get? A black screen. This was not a surprise as there was still the possibility of unseen battery damage on the motherboard. Since black screen is an indication of a non-functioning CPU I put together a spreadsheet as a checklist for each of the pins of the 68000. These checks showed that pins 34 and 41 were not connected.
 |
| Lovely, another spreadsheet. |
 |
Bodge wires - not neat but to be
tidied up once (if) it works |
A couple of minor repairs later and it was time to try again, but this time I used the excellent, if slightly unintuitive, DiagROM. This would tell me, either on screen or via the serial port, what the state of the system was at each point during bootup.
To hook up the serial port I used a fairly standard USB to serial converter so I could use a modern PC. The last part had to be done by using individual wires with female to female 'dupont' type connectors. These are just the right size to push onto the pins of the male plugs. Only three connections were required, TX, RX and GND. TX on the PC was connected to RX on the Amiga, and RX on the PC connected to TX on the Amiga (this is pins 2 TX, 3 RX and 7 GND on the Amiga serial connector, and pins 2 TX, 3 RX and 5 GND on the PC side).
This was the result:
 |
| DiagROM serial output |
This was actually a good result, even though there is apparently no access to memory. It did mean that the CPU was running the software in the ROM.
Just for giggles, I decided to put the original 3.1 ROM back in and try again. I was surprised at the result:
 |
| Woah! I must be close! |
This made me think that I was on the verge of getting the machine up and running again. With DiagROM not finding RAM my immediate suspicion fell on the logic that controlled the RAM. This had always been the problem with the A500+ machines I had repaired previously so it would make sense that the same would be true here, despite the slightly different arrangements on the board.
To verify this, I removed the following chips:
U540, U541 - responsible for the address lines
U103, U104, U105 and U106 - responsible for the data lines
Two things came from this. Firstly, one of the 74LS373 chips came out as bad and needed to be replaced. Second, many of the pads on U540 and U541 disintegrated as the chips were removed. Most of the pads affected were isolated pads on the bottom of the board i.e. their connections to other parts of the boards were on top. I assume this would be down to the battery corrosion weakening the adhesion of the pads. Certainly, I did not have this problem on other parts of the board later.
 |
| Broken. |
So, after the near miss of the Guru, and the discovery of the faulty 74LS373 we must be on the verge of a successful start-up. Right?
No.
With a new 74LS373 there was no difference in the DiagROM output. Even with the pads repaired on U540 and U541, the system could still not find any working memory. Very, very frustrating.
In my frustration I took a number of paths that proved fruitless. First, I soldered the CPU direct to the board. This made no difference. Then I tried removing the standard Agnus I'd installed to put the MegaChip back in and managed to crack the socket at one corner. F***. Strapping it back up with a cable ties appeared to work but, again, I was still stuck with no chipram detected.
It was suggested that I needed a later version of DiagROM since 1.2.1 and 1.3 Beta had additional address validation on startup and this might help. So I downloaded the 1.3 Beta and broke out the Dataman S4 and my phone sanitiser (seriously) to wipe and re-write my current DiagROM EEPROM. But I hit a snag...
 |
| Dangnabit. |
So I had to resort to eBay for the latest version.
Anyway, it arrived and it told me, unsurprisingly, I had some address errors.
 |
| Error... |
These address errors seemed to be pointing at Address bit 11 being stuck. But despite my best efforts and many hours of tracing out traces (there's no A2000 on Amigapcb.org - sadface), nothing I did changed anything. The actual display output of DiagROM was limited to this:
 |
| Bad memory... |
This screenshot was taken with the standard 8372A Agnus and J101 set to pins 1 and 2, and J500 closed. This should indicate to Gary that there is RAM in the 'Ranger' address space (apparently) hence the bottom of the screen is showing a yellow and red bar. The yellow bar is the first 512Kb of chipram and the second is the 'Ranger' RAM. In any case, it's broken still.
Annnnd, then the serial output from DiagROM just stopped. Having had some dealings with the serial chips in the A500 (MC1488 and MC1489) I knew where to look. Sure enough, after removing and replacing the 1488 - including a socket - the serial started to work again. Until it didn't. I actually worked out that the wires from the power supply to the motherboard were not making good contact. After a quick wiggle of the connector, the serial output came back. Interestingly, this course of action would also restore colour to the video output when it would suddenly decide to go monochrome - although I should point out that I was using an A520 modulator for a quick colour composite output.
 |
MC1488 in a socket. Not really needed
but, oh well. |
By now, several weeks had passed and I had made no further progress. Except I released some magic smoke. At some point during my constant probing, I assume that I managed to short something to ground. Cue a sudden drop in video output, a large puff of smoke and a panicked leap for the power button. It was just a transient thing though, and after a quick repair, I was back to the same position, i.e. no chipram detected.
 |
| Magic smoke generator - oops |
I decided to remove the sockets for U540 and U541 again as well as the CPU and try removing the repairs I had put in originally. I had reached the point where I thought that maybe I had made a mistake during the repairs.
The CPU repairs were relatively straightforward. I have a few reels of wire wrap wire which is perfect for this type of thing. As mentioned above, it's thin enough to be a trace replacement but has a relatively thick coating which also allows it to be used for 'bodge wires' without any danger of shorts.
The repairs to U540 and U541 were a bit more involved but not too onerous. I had drawn out where the pins should go and then got the multimeter on them. I added bodge wires where the traces did not seem to be making contact.
 |
| U540 and U541 connections - what lovely handwriting.. |
 |
| U540 missing traces |
 |
| U541 missing traces |
I also went all out and replaced the Agnus socket (again) and checked all the traces from all 84 pins. Not a fun couple of hours but I did find a missing line from Agnus pin 83 - bodge wire added.
 |
| CPU pin repairs repaired. Again. |
 |
Agnus pin 83 missing link
(repaired during new socket installation) |
Given that I now had another new Agnus socket I also went for it and re-installed the MegaChip. After many hours of careful, methodical repair, would this now work?
No.
Or, at least, not quite.
 |
| Garbled output - but not the usual RAM screen... |
 |
| DiagROM reached this point and crashed - every time |
This is the first signs of life since the Guru so many weeks ago. But what could be wrong? Fortunately, a very helpful chap on twitter suggested it was a crappy Agnus socket. I was initially doubtful, since this socket was nearly new. To eliminate it again, I took out the MegaChip and carefully bent all 84 pins of the Agnus socket out significantly further than they had been before.
Another switch on attempt.
 |
| Oh. |
 |
| My. |
 |
| Goodness. |
It works.
 |
| ROM screen |
 |
| Early boot screen (hold both mouse buttons down) |
 |
The ubiquitous ATK from Keir Fraser
|
 |
| "Colours, so many colours..." |
This has been a real labour of love but it's not over yet. The 2Mb zorro card expansion doesn't work and comes up as 'defective' on boot when it's plugged in. The Buddha card works with hard disks but is, apparently a real pain in the posterior to get working with Compact Flash cards. This is slightly annoying but I do still have a couple of hard disks I could possibly use. The original hard disk does still work but is quite small. I also need to hack the PSU into the space of the original without zapping myself or killing the machine...
Of course, I could just remove my PiStorm from the A500+ and stick it in this too - I think it will fit with the PI mounted to the top.
In any case, this behemoth of an Amiga is on the way back to full use. YAY!


.jpg)


