Tuesday, December 21, 2021

Check out the latest laptop...

 ...in my retro collection.

It's an Epson PX-8 and it is, quite frankly, completely awesome. It actually came as part of a 'bundle' of great stuff that was once again donated by the most excellent work colleague. The whole bundle is going to take months to really go through but here's a quick overview of what we've now got with a one word indication of whether I've managed to test it or not. It's all been in storage for a VERY long time so not everything will work out of the gate but that's expected.


Epson PX8 (with accessories)

  • Epson PX8 computer (working - yay!)
  • RAM Disk (not working - boo!)
  • TF15 Dual 5 1/4 Floppy Drive Unit (powers up but does not read disks - BDOS ERROR)
  • P40 Thermal Printer (not tested yet)
  • P80 Printer (not tested yet)
  • Oval Automation serial display adaptor (DS80) and interface box (DS8) - (not tested yet but not sure of compatible monitor - it may output RF though)
  • Many, many cables...

A selection of pictures:


The Epson PX8


P40 and P80 Printers


TF15 Dual Floppy Drive 
with Oval Automation Boxes peeking out from underneath


TF15 without its cover.
It's a mighty beast!


TF15 came with original card transport
protectors!


At least the PX8 works! Here's Wordstar.


Many, many cables...


Psion Organiser (with accessories)

  • Psion Organiser model XP (appears to boot OK)
  • Psion Organiser model Z64 (appears to boot OK)
  • 3 x 16KB Data Paks (not tested)
  • 2 x 32KB Data Paks (not tested)
  • 1 x 64KB Data Pak (not tested)
  • Maths Pack (not tested)
  • Finance Pack (not tested)
  • Formulator (not tested)
  • Data Organiser (not tested)
  • Pocket Spreadsheet (not tested)
  • Autoscribe Plus (not tested)
  • FileMaster (not tested)
  • Serial cables (not tested)


A brace of Psion.


I suspect some of this might be quite rare...


Dataman S4 EEPROM Programmer

  • Programmer Unit (not working - some battery damage, batteries removed)
  • DIP to PLCC Adaptor (not tested)
  • Original Manual & Cables (reads alright :) , cables not tested)


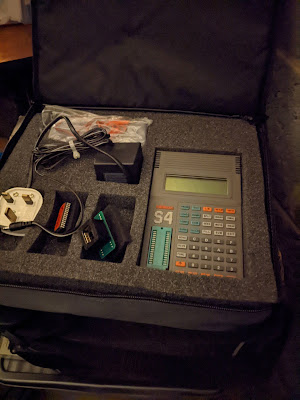
S4 Programmer - lovely!

Ni-Cd Batteries. Not lovely.


Leakier than the leaky bucket of Leaky McLeak
from the town of Leek.


Other Stuff

  • Original CP/M 2.2 disks in 8 inch floppy format with 5 1/4 inch too and an original manual
  • So many CP/M books
  • Misc software including some really, really early Microsoft stuff (c.1983)
  • Various EEPROMS for the PX8 and other systems


SupeCalc. Super!
(8 inch floppy there)


An early Microsoft Thing
(Also 8 inch floppy)


EEPROM City.


So. Much. Stuff. :)


Palm Computer (with accessories)

Not had a chance to look through the box yet!!


So a veritable smorgasbord of delights (or "more boxes of junk filling the garage" - Mrs Crashed). It really is going to keep me going well into 2022!


Merry Christmas and a Happy New Year to all my regular readers!


Thursday, December 09, 2021

Dingdong Pong Throng

Again, eBay is weird. After watching the price of EVERYTHING that is retro gaming or retro computing related absolutely sky-rocket, I still managed to bag a 70's pong clone for four quid.

To be fair, the seller advertised it as 'non-working' and that they'd tried to make it work and it did sort of work but then it decided it wasn't going to work so he wasn't going to spend any more time on it. His loss.

So we have a PrinzTronic Tournament IV something or other. It's a fairly generic pong clone from c.1977 produced for Dixons (a UK high street electrical retailer which is no longer on the high street but Dixons Group owns Currys and the soon to be re-named Carphone Warehouse). It's very silver. And very, very dirty.


Silvery Seventies

Time to get that top off.


There's not much in here...


It's powered by the TI TM1965 pong-on-a-chip chip which is pin compatible with the AY-3-8500 from General Instruments. The bulk of this unit is all the option switches and the game selection switch. And a TV modulator with attached RF cable. RF. Urgh.


The brains of the operation

The power socket is a standard 3.5mm socket which I would normally expect to see as a headphone or mic socket. But it's not out of place in a console of this age and type (looking at you Atari Jr). It's also got quite a bit of corrosion on it from a previously abandoned set of batteries. 


It's not easy being green...

Fortunately, none of this corrosion has made it to the main board. But there is a slight, minor, tiny little issue with the main board. It's got several, what might be described as, hoofin' great cracks in it. Oh dear. This may explain why the previous owner could not get it to work correctly.


Purple arrow - crack in the board
Red arrow - broken solder joint

This is Not Good(R).

So first things first, let's try to get the game selector switch off without causing any more damage. The de-solder station made light work of this and left all the pads in place (almost) which was good. Being from the 70's this is clearly constructed with proper, leaded solder. None of that ridiculous 'lead-free' nonsense here.


Get out o' there!


Next, try to fix the board. The repair here is only intended to try and keep the circuits correctly connected. The cracks are there forever, but I soldered a large pin across the ground plane to try and reduce the stress on the board once it's screwed back into the case. 


Can we fix it? Of course.

One pad did make a (successful) break for freedom and this required the installation of a bodge wire from the appropriate pin of the switch. The rest of the pins should give enough mechanical strength to hold the switch in.

Now this is done, time to test. For that, I needed two things, power and a TV output. I know that this needs 9v since it would have used six 1.5v 'C' batteries. All I had to work out whether the power socket was centre negative, or centre positive. Using my multimeter I checked which terminal on the power socket had continuity to the ground plane and confirmed that it was 'centre negative' just like the Speccy.

For TV, I had to plug it in via RF (urgh), for which I used the 6 inch Sony Trinitron. This was exciting as I had not had to tune it in before, but I managed without having to refer to the manual...


Is this a dagger I see before me? No, it's a telly.


Well, that works then. Note that the bats are missing as I had de-soldered the controllers (such as they are) to allow for easier working on the board. Now I knew it was working, the next job was to improve the picture. This unit has a TV modulator which means that one of the inputs into it is likely to be a composite signal. After a bit of trial and error (mostly error) I worked out which input to the modulator to cut, and which to connect directly to the centre pin of the modulator output. The results are mighty impressive (well, to me anyway) and a vast improvement over RF.


That's better!


Simple composite mod.

So, time to get it all back together. This required me to solder the cables for the 'controllers' back onto the board, juggle all of the cables for said controllers and then feel that I really needed three arms to get everything back into the right place. And then I hit a couple of problems.

1) The right bat would not appear on screen

2) The picture would go weird if anything so much as brushed against the game selector switch.

First job, clean the potentiometer that is the controller. This just needed me to open the case and spray a bit of contact cleaner into the body of the pot and then give it a damn good wiggling backwards and forwards. And this worked - once I soldered the controller back on to the board it re-appeared straight away. I did the same on the other one too since the bat was very jittery on screen. A good spray and wiggle sorted that out too.


Not a lot in these controllers.
DualShock4s they are not.


Next was the game switch problem. I took the board out of the case again and inspected the bottom. I couldn't be sure but it looked as if the solder blobs I had added to the board had broken along the line of the original cracks. Fortunately, the cracks zig zagged across just one track (from the ground plane) so I added another bodge wire.


New bodge wire.

Finally, I cleaned the selector switch in the same way as the controller pots. Spray and a good hard wiggle.

So, second attempt at re-assembly and I, again, wished I had three arms. But I got it back together without the top case and tried it again. This time, both bats appeared and were rock solid, and the game selector switch generated no interference. Every click firmly switched between the game modes with no glitches or stuttering. 

Nice.

After a good clean I re-installed the top case. I should also point out that this machine had a socket on the back for connecting a light gun. I removed this as it is never going to be used - the only CRT I have is the 6 inch Sony - and had already been disconnected from the board anyway. I can live with that.

Another 70's console saved from the e-waste bin. BEEP! BEEP!  BEEP BEEP!


Saturday, October 16, 2021

Making Tape Great

Finally, I managed to get around to testing the cassette recorders with a working ZX Spectrum. (Note that all this playing was done with the minimum of repair work - there are separate posts coming on what I fixed (or didn't)...)


Unnecessary Spectrum Pic


But. I didn't have any mono cables. I tried a stereo one and found that it was, to be blunt, useless. A stereo jack has a connector made of three metal sections. The one at the tip that enters the socket first (no sniggering at the back) is left audio, the one in the middle is right audio and the sleeve at the bottom is ground. For 3.5mm mono the tip is audio and the sleeve is ground.

In all the cassette recorders I have the 'ear' sockets are constructed so that the mechanism that holds the plug in place makes contact with the tip and sleeve for ground as expected.  But the point at which the ground connection on the plug varies. As a result, the cassette recorder might make contact with the tip and ground sleeve but the Spectrum at the other end has contact with the tip and centre ring i.e. no direct connection.

To get around this I came up with a (bad) idea. Take an existing stereo jack to jack lead and join the sleeve and centre ring together at one end. I won't bore you with the details but it was a little bit successful and a lot not very good. It did work and resulted in my getting one of the cassette recorders to load my game but with an additional blob of solder on the plug I was concerned I would damage the sockets. So I abandoned that idea and ordered some cables from eBay. 


A fine example of what not to do..

That's better..

Now I have all the right equipment it's time to get going. Here's the setup I'll be using, a 48K issue 2 ZX Spectrum with a composite mod. The TV is a 6 inch Sony Trinitron kindly donated to me by one of my most excellent work colleagues. I shall be trying to load 'Flight Simulator' by Psion. It should take about four minutes and consists of a very small initial program load, followed by a loading screen and then the main program.


Watched over by Baby Yoda.


So, there are actually six machines that I have and I have listed the results of my shenanigans below:

Sanyo M787G


This one couldn't be tested. It's sadly not working. I do have the service manual for it and I am hopeful that I will be able to get it back up and running again. Watch this space.

Sanyo DR-101

This is the most modern of the recorders I have (if they can ever be called 'modern'). It's also the most slimline and the lightest.

Load that sucker!

Looks promising..


This unit has a switch on the side labelled 'Normal' and 'Data'. I started in the 'Data' position and it actually failed the first time. 


..spoke too soon.

This was a slightly disappointing start to say the least. I switched it to 'Normal' and tried again. Volume was at maximum and it still sounded very quiet through the Speccy speaker. But it worked.

Load time : 3 minutes 57 seconds


Philips D6310

This one was basically a big pile of plastic bits for a long time. Following the 'great reconstruction', thanks to the supply of new cogs from my awesome brother, it now works - or at least it plays cassettes. It's very noisy but it could just need some lubrication in the right places. Not so sure about whether it will load Speccy games.


It's a beast.


First attempt, well it didn't go well. It did get as far as the loading screen but the bottom third was the wrong colour and once it finished that block I was presented with the infamous 'R tape loading error' (again).


So close, but so far...

Second attempt, re-seat cable and reduce volume very slightly. And...even worse. It didn't even get to the screen before the tape loading error message made another appearance.


Our situation has not improved.

Load time : FAILED


Bush (no model number)

Note the 'Rank Organisation' Logo

I had high hopes for this one and I wasn't disappointed. Well, not as much as for the D6310. This one has a handy 'tone' control along with the volume and I set them as you can see in the picture, volume about 9 and tone about 8. 

I'll give it this, it loaded the game without any problem at all. The only fly in the ointment was the loud clanking from the mechanism as it played. I could remove it completely by gently applying pressure to the 'STOP' button so there is obviously something out of alignment inside. And the rewind refused to work too. Some work required on this one then. But at least it loaded!

Load time : 3 minutes 53 seconds


WH Smith CPD8300


A mighty machine

This is another beast and the only one that came with its own plug attached. It has a 'monitor' switch too so I could listen to the cassette output at a decent volume from the speaker. On the back is also a selector switch that could be either 'Spectrum' or 'Other'. What is it about the Spectrum?!

What else is there, except 'Spectrum'?

No problems loading with this one. The only thing is that the 'monitor' function could really do with a reduction in volume. I had to put my hand over the speaker, the bloody thing was so loud! I did try again with the monitor switch to 'off' and it worked fine too - and was much quieter.

I did have some problems with this one randomly stopping but I put that down to the tape being wound too tight (thanks to the Bush machine). A quick fast-forward and rewind sorted that out.

Load time : 4 minutes 9 seconds


York Radio Cassette

I hit an unexpected snag with this one. The audio out was a DIN socket and I couldn't find a headphone socket...

No 3.5mm socket? Sad face. :(


So, after all that, I only managed to get four machines of six machines actually tested and, of those, only three would actually load the game. The biggest disappointment to me was the Philips as I put many hours into getting the bag 'o bits back into something sensible. There are still some tweaks I can do it so all is not lost with that one.

I was very interested to see the difference in loading times. Over four minutes for the WH Smith unit just confirms what I thought in that it runs much slower than the others. 

Loading from tape is archaic and very, very slow and error prone. But those noises whisked me straight back to the front room of my Mum and Dad's house in 1984. Happy days. :)


Sunday, October 03, 2021

The Most Challenging Composite Mod - In the WORLD. (Maybe not..)

A short interlude before I start playing with cassette recorders..

My Acorn electron is still waiting for some more attention, mostly because I don't have the correct cable to load cassettes and I don't have the 'retro' budget to splash out on the available SD card type options. 

An Electron walks into a bar...


But one thing I hadn't realised was that the composite output is actually monochrome. I was quite surprised at this as I knew I'd seen videos of people using their electrons with gloriously garish colour through composite. Well, it turns out a fact well known to Electron aficionados is that there is a very, very simple mod that can be made to change the monochrome output to colour. This was completely unknown to me, of course, but here's the proof, direct from the Electron service manual:


So, according to this, all I need to do is bridge the link labelled 'LK4' and it will add the chrominance component to the composite output i.e. monochrome becomes colour.

Time to break out the screwdrivers.


Electron bottom...

Gratuitous Action Shot


Under the hood.

With the motherboard completely removed from the case I just needed to find LK4. It wasn't too hard to find.


LK4, whereart thou?

Gotcha!

With the link located I decided to take a leaf out of Mark Fixes Stuff's book and, instead of just soldering a link across it I would add a couple of header pins to allow a jumper to take it back to monochrome i.e. it would be reversible.  After a bit of scrabbling around in the spares box I liberated a four pin header from an old Sky box motherboard and proceeded to snap it into two two pin headers.

First soldering job was to clear the two holes of the existing solder. This was easy enough with a dab of flux and some solder wick. Surprisingly, the hardest bit was soldering the pin header to the board. Holding the pins in place with my finger resulted in several minutes of inappropriate language as the rapid transfer of heat through the pin, fully complying with the expected laws of thermodynamics, burned my bloody finger. 

Trying to hold the pins with pliers proved tricky to say the least. After another minute or two of appalling profanity I manged to get one leg holding on by the merest sliver of solder. This was enough to allow me to solder the other leg and then finish the job. It's not the straightest but it's only got to hold a jumper. Annoyingly, that transistor (see below) made it tricky to get one on. A firm push of the transistor moved it a sufficient amount to remove that problem..


Lovely jumper.

But did it work? After re-assembling the case and doing all the screws up I realised I hadn't taken any pictures of the Electron in monochrome, so no Before and After pics. But here's the evidence that my traumatising injury (slightly burnt fingertip) was worth the agony (mild irritation).


Colours. (Ignore the reflected bald head.)


And now, back to those pesky cassette recorders. (Well, soon anyway.)