Sunday, May 26, 2024

Another Mug's Eyeful - PCW9512 Part 2

After having the PCW sat around for a while I decided it was time to get a boot disk sorted for it. The only 3 inch disk I had was actually for a PCW8256 which is not directly compatible with machine (sort of) and it certainly wouldn't boot the PCW9512. So on to eBay and, following a quick search, a correct boot disk was in the post.


A totally not AI generated picture of the disk
because I realised I didn't have a picture of 
the real one and panicked...

A few days later I excitedly ripped open the cardboard envelope and went out to the shed and dug out the 9512 from it's shelf. First I switched it with no disk, just to make sure the CRT was still operational and there would be no unexpected bangs or magic smoke. Sure enough, a white screen followed by three loud beeps i.e. can't find a correct disk.

The boot disk was inserted and the machine reset.

And...

Nothing.

Well, not quite. The screen flashed, the drive tried to do stuff and then, after twenty seconds or so, three beeps. Darnit.

I had replaced the belt for the floppy drive late last year so I knew that the drive should be good to go. There were two possible issues. Either the disk I received is faulty (unlikely), or the drive needed to be calibrated to read the disk (slightly less unlikely given the unit's age).

I have to tell you now that getting to the floppy drive in these machines is a real pain in the backside. You need to dismantle it almost to it's bare components to get close to it with many screws to remove, several of which are different sizes. And it also has the added spice of a CRT which, as we all know, can store several thousands of volts to make you sad if you accidentally touch something inappropriate.

But with no other choice, I got the screwdriver out and got started. Eventually, I ended up with the unit on its side and the floppy drive hanging out on its cables. This was rather precarious to say the least. What I was planning was to loosen the two screws that hold the head stepper motor, rotate the motor a fraction and then try reading the disk again (this is the technique employed by Noel's Retro Lab when he worked on a CPC6128 floppy drive). It was not straightforward and the closest I got was when the thing suddenly started to seek in a different way and, eventually, I got four beeps.


Danger! Danger! High voltage!

After a bit of a ponder I realised I could put it back together enough to make it easier to work on, but with the floppy drive connected via the cables dangling out of the front of the case. Much better.


Ah! That's better. And safer..


But then things went wrong. After an hour of tweaking backwards and forwards I still hadn't found the sweet spot. But I had found that if I held the drive in my hand, it would 90% of the time, seek as if it was a read error (four beeps) rather than 'no disk found' (three beeps). I wondered if there was a capacitor issue. The board on these things is quite small but there were a few electrolytic caps on there that I just so happened to have in stock. I didn't get any proper pics of this but there's one that shows the red capacitor which is one I changed. Re-capping isn't really a spectator sport.


A red capacitor. That I put in. Steady now..


But the drive continued to behave exactly the same. Before I could work out why this was the case, the drive died. Dead. Kaput. No sign of life at all. I switched it on and got exactly nothing.

Darnit, again.

I started to look at the circuit board and see if I could work out what had failed, starting at the power supply rails. With the power on, there was 12v at the power plug and at a couple of other places on the board. But there was nothing on the 5v rail at all beyond the power plug. This was worrying as the 5v  rail drives the chips on the board.

After some probing I found that there is a component called Q4 that was open circuit. A similar component was at Q3 but this wasn't open circuit but seemed to short circuit. I couldn't believe that this would be correct so I desoldered them for a closer look. Being through hole components they were simple to remove and a quick Google of their numbers (N11004 and N11008) revealed that they are 'circuit protector' devices, very similar to fuses except they continue to work if the overload current disappears - in theory. The N11004 stops conducting at 0.4A and the N11008 stops conducting at 0.8A.


The protectors.

I put them both in my component tester and found that the N11008 came out as a negligible resistance (correct) but the N11004 came out as 'broken part or no part inserted' (incorrect). 


N11008 has a tiny resistance


Broken. :(


So, I decided to take a risk and solder a wire link across where Q4 actually sat on the board. What's the worst that could happen? It's dead and useless anyway..


Link added at Q4. 
No protection on 5v but I'll take that risk

Nervously, I switched the PCW back on again and...

....partial success. The disk now spins. More importantly, it spins when the PCW is switched on and the it stops when the PCW emits it's three beeps to say it couldn't find a disk. So it half works. But without the heads moving, it's a bit of a doorstop - and not a very good one as it's too small and light. 

I looked up the other chips on the board and found that the M52819 is the floppy drive controller and interface. I'm fairly sure this chip is OK as it is trying to control the drive as shown by the spindle motor starting up and turning off. The next chip is marked MH003 and I can find nothing on this chip at all. I have no idea what it is or what it might be. Any suggestions welcome.. The final chip is actually a through hole device and is on the other side of the board. This one is an AN8250N which is a 'stepper motor driver' chip.


The AN8250N hiding in the background...
(This picture looks familiar... Hmmmm...)

Ah-ha! Perhaps this is the cause of the issue? I saw from the datasheet that pin 9 is the 'starting voltage' which should have a typical voltage of 10.2v on it. When the PCW is switched on this voltage is a steady 1.8v so something is clearly wrong. There is a tiny SMD transistor mounted between the pins of the IC and the top contact is connected to pin 9 so I started to wonder if that was acting as a control to the starting voltage. I could try removing it from the board and then test it with the component tester but I've seen ants bigger than this transistor.


This is about the size of a thick grain of rice...

So I decided to solder a wire to the board at each of the three contact points. I have a reel of wire wrap wire that is a very thin coated copper wire which is perfect. It wasn't too difficult to solder the wires on to the board but the result from the component tester was a bit odd to say the least..


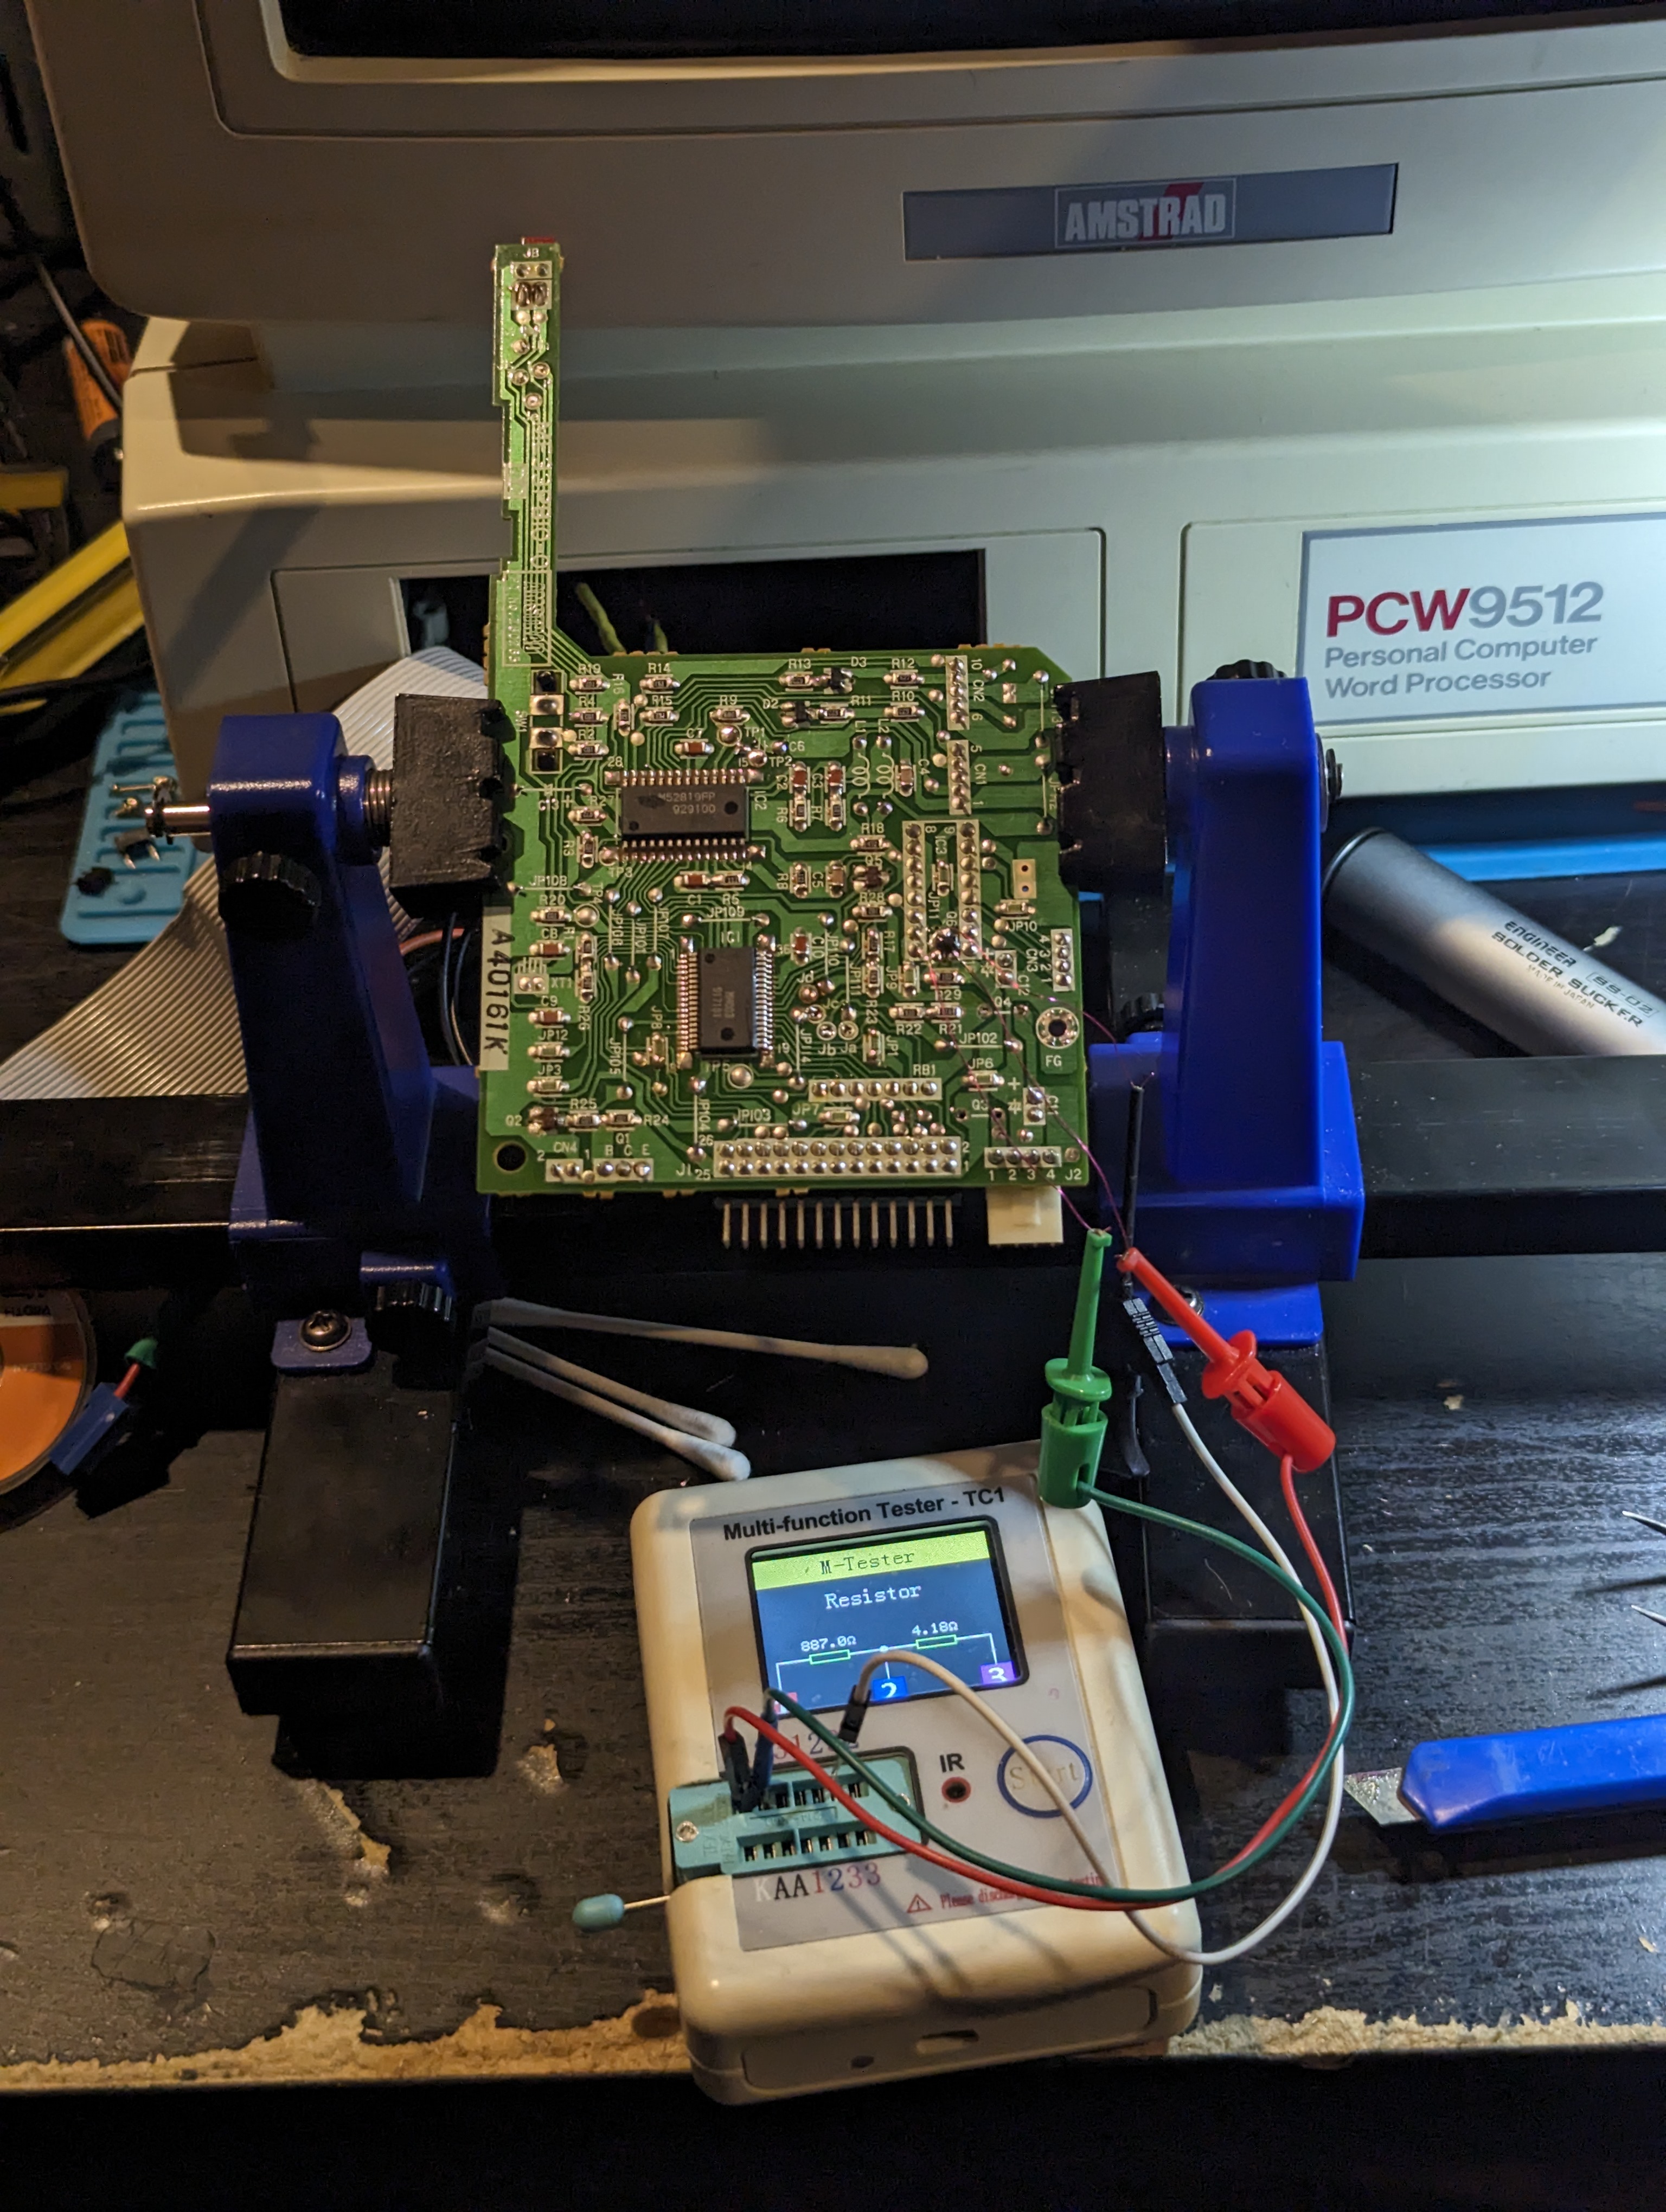
Component tester plugs hanging from the
thinnest wires in the world..

It came out as two resistors in series with values of 887 ohm and 4.18 ohm. This really doesn't seem right but could be as a result of the fact it is in circuit. 

I decided that before I start looking for an AN8250 on eBay (or other) I should see if I can replace that SMD transistor. It has the marking 'CR' on it and this seems to be a C945 NPN transistor. So I've ordered some of those but it will be a while before they arrive. 

In the meantime, I have a cunning plan....for next time.

Wednesday, May 01, 2024

And now for something completely different...that actually works (spoiler).

For various reasons my spare time is currently devoted to other things which means I don't have a lot of time for the vintage/retro/possessed computers of old. But I stumbled across a youtube video that intrigued me. It was such a simple thing. And it was cheap. 

It is a simple bluetooth adapter that can be installed in a ZX Spectrum which completely removes the need for a cassette player to load games. (You can't save anything with it but that's not an issue - keep reading). When the speccy is switched on it powers the bluetooth module up and it becomes available for your phone or other bluetooth device to connect to. Then all you need to do is play a .wav or similar file taken from a speccy game cassette and it loads just like you have a cassette player installed.


My speccy with no lid


"But", I hear you cry, "you have one of those fancy SmartCards from the chaps at Retroleum (now at version 3.1 but mine is a version 2). Why would you need to do such a thing?"


My Smartcard v2 in a 3D printed case


Because I bloody well can. So there.

A quick trip to eBay and I got a ridiculously cheap bluetooth board, specifically advertised to work with the speccy. Installation was dead easy and required just three small wires to be soldered to the motherboard, +5v, GND and Audio. 


I'm blue ba da...oh I already did that joke


I located it underneath the heatsink - I hope it'll be OK there as it does get quite hot, I really need to get one of those modern voltage regulators that don't generate any heat. The +5v and GND were soldered to one of the caps and the audio wire on a resistor close to the 'ear' socket (which everyone knows should have the BLACK connector on the original cable - that's a hill I'm prepared to die on). 


"I have the power!"

'Ear, what you up to?


Button her up, she's ready to go.

And that really is it. After putting the case back together I plugged it in and checked that the Sinclair Research message appeared as normal. Nothing is any different unless you search for bluetooth devices with your phone. Then you will find an additional device 'BT_Audio' or similar. There is no password or anything on the bluetooth so just tell your phone to connect to it. Once it's connected, all audio will go out through the speccy's tiny, tinny speaker. 

But that's just fine for loading stuff. I downloaded an app (Google it) which contains many spectrum .TAP images and which plays the audio through the phone as if it were on tape. Then I connected to Bluetooth and set one of the games to start loading... And...

Chase HQ. An epically good Speccy game

..it works perfectly. If I have one criticism it's that the volume of the audio isn't that loud through the speaker. I don't know if it's because the Bluetooth units volume is deliberately set low, or whether it's because of where the signal is injected but it is still very quiet even when the phone volume is turned up full. Everything loads without issues though so I assume because it is a very 'clean' signal going into the Speccy the system can handle a bit less volume. Long time speccy owners might notice that the raster bars for the initial signal don't look quite right, where I think they would if the volume was a bit louder.

I can, of course, still use the SmartCard but what it does mean now is that any audio files I get that aren't compatible with the SmartCard I can load into the speccy as if it were from a cassette and then hit the NMI button and save an image to the SD card. To do this took a bit more fiddling than I expected as I couldn't work out how to get the speccy to just boot to it's normal startup but still have access to the SmartCard.

What I ended up doing was loading in VU-3D. Then I broke into the program (it's mostly in basic) and the typed 'RANDOMIZE USR 0" which basically does a reset. Then, once the 'Sinclair' message appeared I clicked the NMI button on the SmartCard and saved the image as a blank image. This means if I load that image back in, I am back to a plain, empty spectrum experience.

The upshot of all this is that if I have a game I want to load via the Bluetooth then all I need to do is load up the blank image, type LOAD"", press play on my phone and wait for whatever it is to load. Once it's loaded I can press the NMI button and save the new image as something else. I can't believe I'm such a genius..... :D  So far, I've loaded the original Jet Set Willy (I only had JSW2 previously), Ghostbusters and a couple of others. It's surprisingly nostalgic - if a bit quiet - listening to the loading sounds of the speccy, but still very functional.

Anyway, it works, it was cheap and it means I can post something relatively quickly before I go back to 'other stuff'. :)

Gratuitous Spectrum shot

Don't worry, I'll be back to the Torch Triple X soon, despite me now thinking it's possessed...


Wednesday, February 21, 2024

I'm Blue, da ba dee dabba da-ee - Torch Triple X - Part 6

Time for a bit of a break from the Torch's motherboard. 

During my escapades with this computer I ended up plugging in the hard disk and floppy disk 'layer' as well as the motherboard just to check if it needed to have connection to a drive to boot (who knows with stuff this old!). Sadly, it didn't make a difference but it did show me that the hard disk actually started up and did not sound like a howling banshee. I'm looking at you, Cifer.

The main drive is a similar style to the Cifer drive and uses a stepper motor rather than coils to control the heads, as was the standard at the time. It spins up and makes some happy chirping noises. This is all a great sign but without the main computer up and running what can I do?


Hard disk, rear and centre. 
(Pic from last year before power supply shenanigans)


*BlueSCSI2 has entered the chat* (as the kids might say)

The latest iteration of the amazing BlueSCSI project now has a fantastic function called 'initiator mode'. Now, I have not been a huge follower of this project but this new feature caught my eye as it said that it could read disks even without the host computer being available. Interesting...

And by coincidence, RMC happened to mention the BlueSCSI board and how to get them from the chaps at Flamelily IT. So an order went in and a couple of days later a parcel dropped through the door.

I went for the kit version that included a configured Pi Pico which is about £14 cheaper than a fully built unit. You could order a kit without a Pico too and save another £8. Anyway, building the unit was really straightforward and basically consisted of soldering on the right angle 50 pin SCSI connector, the power connector (like a floppy drive connector) and some pin headers. It genuinely took me less than half an hour to solder everything in. If I had any complaints it was that there is literally no documentation provided with the kit but given the limited soldering needed to build it I suppose that's not a major problem.

BlueSCSI raring to go..

Documentation to use the thing is available from the BlueSCSI github and it's also linked to from the Flamelily website.

First things first, to read a disk image I need an SD card (full size). Fortunately I have an 8Gb microSD and a gazillion adaptors to convert it to full size. This card needs to have a small file on it to tell the board to go into 'initiator' mode. 

Next task. Get the jumpers in the right place. The unit in the Torch uses a standard SCSI 50 pin connector so it was as simple as plug it in to the BlueSCSI, insert the SD card, swap a couple of jumpers, apply power to the drive and the BlueSCSI and... 

...nothing.

Ooops. In my haste I had missed one of the headers on the board that had to be set for 'initiator' mode. Install the header and stick a jumper on.


Target the initiator! Or something...

Initiate! Initiate!

Take 2.

The drive spun up and the Pico light began to flash, slowly at first but then it started to flash quickly and I could hear the drive heads moving. Nice! After a few minutes the flashing on the Pico went back to being slow and there was no more activity from the drive so I powered it all down.

Now, to see if there was anything viable on the card. First I looked at the log file and I could see that the drive responded to a query from the board on ID 7. Then a long list of data copying, sector by sector. Then, to my surprise, the drive also reported it had data on ID 0 and so the BlueSCSI copied that data too. I suspected that they were actually the same and it does seem to be a bit of a bug as per Adrian's Digital Basement video (released as I wrote this - spooky).

The upshot of this is that there are two .hda files on the SD card, each just over 40mb. This is great news as it means that we now have something we could possibly archive from the drive. To verify this I went and loaded one of the images into a hex editor and, sure enough, data is clearly visible.

But then I hit a snag. I decided to try and look at the files by mounting it in Linux. It did not work. It still does not work after several days of trying. I can only assume that there is something odd about the filesystem that modern systems don't like, even though the captured file is correctly identified as a 46Mb image with filesystem FAT16. Never mind. I do at least have the .hda files that should, in theory, be useable on a BlueSCSI in HDD mode once I get this thing up and running..

But wait, I have another full size SCSI drive. Perhaps I could get an image from this one too. Let's plug it in and see shall we?


Oh dear. Of course I knew it was dead before I took the lid off otherwise I would have just killed the drive myself. But it was gone. I dismantled it to see if I could find the damaged platter. The photo is just one of several that were damaged and is the only one I could get an anywhere OK photo of. For some reason trying to take pictures of highly polished surfaces is surprisingly hard!


Ring of death.


And now, back to the motherboard... (next time).

Blue.


Thursday, February 01, 2024

Socket to 'em! - Torch Triple X - Part 5

At the end of the last installment I had managed to order a spare DMA controller for not too much from eBay. Well, it arrived and I very carefully installed it in place of the existing chip and...


DMA! DMA! DMA!


...no difference. The unit stops at the blue screen, the 68010 fails to start properly and the error beeps for 'main CPU timeout' still ring out from the monitor after 20 seconds or so.

Darnit.

And it was about this point where my replacement ATX power supply started to make worrying buzzing noises. After unplugging it as quickly as possible (and following a quick change of underwear) I put it to one side and decided to come back to it later. Fortunately, I still had my bench supply and I had received a suggestion to use said supply, current limited to about 2 amps to see if I could work out if there were any shorts on the board.

To cut a long story short, the supply went straight into current limit mode and the voltage across the board was exactly the same in every location at around 2.3v. As an experiment I tried to see what current the board would actually be pulling if the voltage on the 5v rail was actually 5v. It draws over 4amps. That's 20 watts for a relatively small bunch of chips. The technical manual suggests that the supply would be drawing a minimum of 2amps but 4amps is worrying.


That's a lot o' amps..


Next thing to try was the capacitors. There are no electrolytic caps on this board but there are about eight tantalums which could fail as short circuit. Perhaps one had failed and was causing a short to ground and the excessive current draw. But after removing them from the board they all checked OK. So then, in a slight fit of frustration (not the last) I removed EVERY 100nf bypass capacitor and checked them all. And there's eleventy billion of the little buggers. I found a bunch of about 20 or so that came out as 70-80nf instead of 100nf. These are clearly out of spec and I will replace them but they're not so far out as to cause any problems. 


Should be 100nf.

Woah! Should be 100nf..

Crikey! Should be 100nf!

Can you guess what? 
Should be 100nf...

Faulty. The lot of you!


After replacing all eleventy billion of the caps and new ones to replace the faulty ones, the result was...

No difference.

Darnit. Again.

Looking over the schematics, and thinking about the various buses in the system it's obvious that the QBUS is working as we are clearly running code from the EPROM. Based on the 'garbage' that used to appear on the screen, the video RAM also seems to be working correctly as this is where the code is loaded before the startup of the 68010. With this in mind I listed out the chips that touch the PBUS and decided to de-solder them so I could test them away from the board - this also means I could install some sockets.

There were a fair few chips in that list. Some of them I could test using my el-cheapo IC tester (but more on that later) but a big proportion were 74LS244, 245 and 373s. These aren't supported by the tester so I had to think of another way to test them.

Enter the Amiga A500+ motherboard! This uses the 74LS244 and LS373 in the data path for its RAM. They are usually the chips that take the brunt of the leaking battery on the A500+ (excluding Gary - poor Gary), and so the A500+ board I have already has them in sockets. It was a simple case of swapping one chip in at a time and checking that the A500+ board booted and didn't generate a green screen. So after a half hour of chip swapping I ended up with a pile of working 74LS244s and 74LS373s.


Ah, the Amiga. 
(Ignore the sockets - I ran out of 20pin ones...)


Next, the 74LS245s. These were a bit more involved and needed me to build a test circuit on a breadboard. Using 8 LEDs, 8 resistors and a bunch of link wires, it was possible to send 8 bits across the chip in either direction based on the level of the DIR pin and check the results using the LEDs as indicators. The upshot was a small pile of fully working 74LS245s.

We're running out of possible suspects on this board...so in the next fit of frustration I de-soldered pretty much EVERY chip from the board.

I thought I had found a problem on the board when a 74LS148 came out as 'BAD' on the chip tester. There is only one of these on the board and its an '8 to 3 priority encoder' which takes eight inputs and turns it into a 3 bit binary output based on the most significant bit on the 8 bit input. The three outputs connect to the IPL0, IPL1 and IPL2 control lines on the 68010. If I have understood correctly, the combination of these lines determines the type of interrupt received by the CPU. My theory was that the faulty chip was causing a non-maskable interrupt that the CPU could not reconcile with a system device causing the CPU timeout. So I ordered some new 74LS148s.

The first thing I did when they arrived was check them on the chip tester. Every one (there were four) came out as 'BAD'.


Oh, no it isn't!


Darnit.

This was annoying for two main reasons. Firstly, I know that the chances of all of the new chips being faulty is slim. This means that this is another case of the chip tester not being accurate. Secondly, the original 74LS148 is probably not faulty either which blows my (rather good I thought) theory out of the water (and I paid for chips I didn't need).. 

The upside of all this though, is that pretty much every chip now has a socket. This will make it much easier to change chips but does introduce a small liability of poor contacts in the sockets. And the hassle of putting them all back into the board again....


So. Many. Sockets.

So. Many. Chips.


After carefully putting every chip back where it should be (foreshadowing), I tried to start it up again. And this time, it was worse. The garbage was back on screen but was not like the previous type. This garbage scrolled down the screen and stopped. No other sign of life. 

So I embarked on a marathon of chip re-seating. Fortunately, using my epic new schematics, I managed to track the problem down to the timer chip. A firm re-seating was all that was needed. The situation improved in that the garbage was as I'd seen before i.e. a series of straight lines moving down from top to bottom followed by a smaller descending rectangle of 'different' garbage. I wasn't happy though as I wasn't getting the beeps out of the monitor to indicate that the CPU had timed out.

Hmmm.

I knew that the audio came from pin 9 on the service processor so it was time for the oscilloscope. And would you believe it..


Bip, Beep, Beep, Be...

So the sound isn't working now even though the service processor is sending out the correct signal. Not a huge problem as long as I know the service processor is still kicking up a fuss about the 68010 not starting up.

But I was still puzzled why I was getting the garbage on screen. Tracing through the video palette schematics I noticed that two chips U26 and U27 should have been a 74F257 and 74F253 respectively but, somehow, they'd been mixed up and actually had a 74LS257 and 74LS253. Interesting.. I swapped U26 and the amount of garbage was reduced. So I swapped out U27 and the garbage was gone! Yay!

But was the board still generating the expected error?

Oh yes. 


I have a habit of uploading the worlds most ridiculous videos. The first 'blip' is the 'beep' it should make when it's turned on. Then, after about twenty seconds or so, the main error beep starts and is 'short long long long', the code for main CPU timeout.

So that means, after all that effort of desoldering and testing almost every IC on the board, buying some chips I probably didn't need, soldering more sockets than any sane person ever should and carefully re-inserting all those chips, I'm basically back to where I was when I started looking at this.

One thing I haven't considered, and which I really should have by now, is if any of the traces on this board have been damaged either by the leaking battery acid from the power supply, or by my removing the chips from the board. I feel a massive spreadsheet coming on..


Saturday, January 06, 2024

Are you keeping up with the Commodore...

A little while ago - sometime in July(ish) - I happened to mention my hobby of messing about and fixing (sometimes successfully) old computers to a close family friend. They, by chance had a Commodore 64 that didn't appear to be working which they hoped I could have a look at.

Challenge accepted.

After a bit of a delay we managed to pop round to see them just after Christmas and, there waiting for me, was a box containing a Commodore 64C. Nice. We tried to make it work there and then and after managing to tune in an analogue channel on their LCD TV the familiar blue screen popped up via RF, proving that the actual machine itself was somewhat working.


C64c circa 1990ish


Having prepared for the visit I had got hold of an 8-in-1 diag and dead-test cartridge which I then dutifully inserted (after switching off) to see if there were any unseen faults lurking. Sure enough, the diagnostics seemed to be saying that the user port and serial ports were 'Bad' as was the SID (darnit).


Bad SID. But is it though?


Despite this, we persevered and tried to load a game in from tape. It didn't work. The screen went blank as expected but nothing was found on the tape.

At this point I needed to get it back home and on the bench to see what could be done to restore this C64C to its former glory. In particular, I was keen to know whether the serial and user ports were 'Bad' because they were actually faulty or whether the diagnostic was expecting some sort of test harness to be attached. So I was entrusted with the precious machine and it came home with me.

Good news first. The keyboard works perfectly. Every key is fine and is registered immediately it is pressed. Next, the SID was not dead! Yay! The SID in the C64C is the later 8580 variant which, although viewed by some as inferior to the original 6581 chip, is generally regarded as a bit more reliable and less likely to fail due to old age. The diagnostic still reported SID as faulty and because we didn't have any sound on the RF I thought that this was correct. However, when I got home I used a composite video cable with separate audio to connect to the TV and the diagnostic sound tests come through loud and clear. It isn't 100% though, and the 'burn-in' tests report one minor failure when it tests the SID. I can't work out what that is but it didn't seem to affect the games that loaded up later - but I'm getting ahead of myself. SID working is a huge relief as prices for original chips are currently sky-high and are likely to only keep climbing as more of them fail over time.


One fault on SID but it's not noticeable


Back to the faults. With the Cassette apparently not working and the serial and user ports reporting as 'Bad' I immediately suspected the CIA chips. There are two of these on the board (similar to the later Amiga) and they control various input and outputs e.g. keyboard matrix, timers etc. I opened up the C64C and it was obvious no-one had been in there previously, even though the warranty seal had been broken. Straight away I could see that the two CIA chips were soldered directly to the board.


Left keyboard support

Right keyboard support

Main board top view


CIA chip

The other CIA chip

One way to troubleshoot the CIAs is to swap them over. If the fault changes then one of the chips is faulty. To swap these I would need to de-solder them from the board. This was slightly nerve-wracking as I have never worked on a C64 board before. I've done plenty of Amiga A500s but the C64 is a much earlier computer and the earliest boards can be fragile. Fortunately, there were no issues with this board and it was actually very reminiscent of the later A500 boards, being of a pretty good quality. I took my time too and I have just replaced the nozzle on the 'moo-ing' de-solder station which also probably helped.


CIA chip removed and socket
added


With sockets installed for both chips I checked to make sure it was behaving as it had done previously, which it did, and then I swapped the two chips to see if the faults changed. 

They didn't.

Ah.

I was not expecting that. This immediately suggested that the two CIAs are actually OK. So, to see if the cassette unit was working or not I dug out a blank cassette which I had stashed for a rainy day and typed up the ubiquitous 'hello world' program in BASIC. Then I saved it to tape - which I had to Google how to as I've not used a C64 before. After re-winding the tape I reset the C64 and then tried to load my saved BASIC program. And it worked.

So, this meant that the cassette drive is fine but that for some reason, the original game tapes were not being read correctly. At this point, any veterans of the cassette era will probably be hopping up and down with a single word on their lips. Azimuth.

Very briefly, in a cassette drive there is a read/write head that should be perpendicular to the track that is present on the tape. If the head is at an angle or too high or too low, the signal being read is distorted or too quiet or missed entirely, meaning that programs will not load correctly. 

To adjust the azimuth of the head simply needs a small screwdriver to twiddle the adjustment screw that is located on one side of the head. On this cassette unit the screw had a small blob of locking compound on it. To remove this I had to dismantle the unit and, while I was there, I also cleaned the read/write and erase heads with 99% isopropyl alcohol on a cotton bud.

After carefully tweaking the screw about a half turn anti-clockwise I tried loading in 'Squash'. And would you believe it actually found 'SQUASH'. At this point I had to Google what to do next as the tape had stopped. Of course, it just needs either 'Space' or the Commodore key to be pressed to continue. There are no raster bars on the 'Squash' game. Which was annoying as I had no indication that things were proceeding as expected. And then a line of text appeared across the top of the screen with the publishers name. This was a good sign. About 45 seconds later a loading screen appeared, depicting two people in a squash court. This was another good sign. 


Is this a loading screen I see before me?


Then after about five minutes the loading screen disappeared and was replaced with the original line of text. Hmmm. This was not a good sign. Eventually the tape ran to the end and stopped. 

So I tried another tweak to the screw and gave it another try. The same happened as before right up to the loading screen disappearing. I expected the tape just to run through and stop again, but I was wrong. After another minute or so the picture of a squash court with a side panel appeared, asking me to select a 5, 3 or 1 game match. Awesome!


Squash. Who's Jonah Barrington?


The other games that I had brought home to try and make work were Postman Pat 2 and Postman Pat 3. There is a Postman Pat fan somewhere in this story... :) Anyway, I tried PP2 and this got as far as a loading screen but then the game failed to start - or at least, nothing happened and the tape reached the end. So then I tried PP3 and, again, a loading screen appeared but no game at the end, just a light grey screen.

This was still an improvement!

To cut a long story short it took quite a while to hit the 'sweet spot' with the azimuth. I connected my oscilloscope to the board of the cassette drive and I could see the digital signals being fed into the C64 which was cool. I could influence the signals by going to the extremes on the adjustment screw but it was still hit and miss as to whether any game would load.


Oscilloscope - Connected to the digital input to the C64

Eventually, I undid the adjustment screw on the head until the head didn't move any further. Then I tried to load the Squash game. This failed completely so I turned the screw one quarter to slightly tighten the adjustment and tried loading Squash. Rinse and repeat. On the fourth go I got the loading screen. On the fifth, the game loaded properly. Immediately I tried loading PP2 and was met with a fully loading game! Yay! So, then straight to PP3 and although this got to the loading screen, the game failed to start again. So I tweaked to screw another quarter turn and tried PP3 again. And it loaded, perfectly.


Postman Pat II


Postman Pat III


Then, to make sure the adjustment was still OK I went back and loaded Squash and PP2 again. And they both worked without (too much) trouble. One thing I did find was that Squash will only load from side 2 no matter how the azimuth is adjusted. Odd, but bearable providing the two PP games worked!

Finally, to make sure that the adjustment didn't move again I put a blob of Mrs Crashed's nail varnish on the screw to lock it into place. 

One final test, I loaded all three games again after re-assembling the cassette drive to make sure that I hadn't messed anything up while I was screwing the case back together. 

So now the main unit is working, the games load from tape and the only thing left to do was to check the joysticks. Time for my Heath-Robinson USB powered joystick tester! 


Archer Joystick under test.
Up and Right directions lit.


The first joystick is an Archer quickshot 2 clone (Archer being a brand of the now defunct Tandy - or Radio Shack if you're in the US). This is the better of the two units as it has microswitches and actually feels very sturdy. All the directions were fine and the trigger fire button was OK too, as was the 'auto-fire' function. The top fire button didn't work, and I suspected it was just the microswitch that needed a clean. Sure enough, after removing the cover from the handle and a quick clean being carried out on the top microswitch, it was back in business.


Top microswitch needed a clean.

The second joystick is a Quickshot Python. This worked without any issues although it's not as nice as the Archer as it doesn't have the nice clicky microswitches. I used to have one of these with my Amiga, back in the day, so it did bring back some happy memories. 

And that's basically it. This C64 is ready to go back and be enjoyed again by its original owner.