Wednesday, February 23, 2022

What did I come in here for again? PX8 RAM Disk.. Detailed Look Part 1

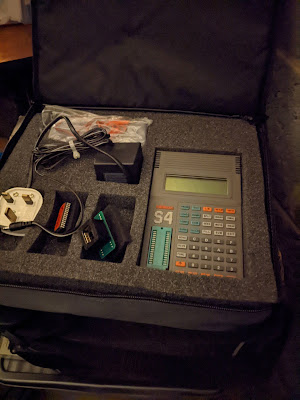
The PX-8 is, by todays standards, a bit lacking in features. The screen is barely a few inches high and as it's LCD it's not much better than a modern calculator. There's no backlight either, so actually seeing anything on it requires maneuvering your head around as if you're dodging bullets a la Neo from The Matrix. But it is still awesome.

It has a fairly standard, for the time, 64Kb of RAM built in, some of which is allocated to a RAM disk. This obviously reduces the amount of memory available for use of the system and applications so it's a rather good thing that there also came a 128Kb RAM disk. This is quite an unusual thing in that it bolts to the underneath of the PX-8 and, like the PX-8 is battery backed-up i.e. it is (in theory) more like an SD card than a straight RAM expansion - but more on that later.

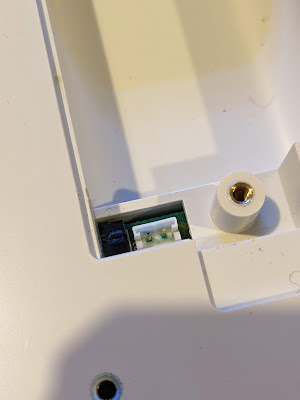
It came attached to the PX-8 and, sadly, when I switched it on I was faced with a sad little flashing cursor rather than the expected boot screen. First thing to check was the cable. This is very neatly tucked away behind a plastic panel on the back of the unit. A quick flick of the screwdriver revealed a rather short and stiff ribbon cable. 

I removed the end from the PX-8 itself and tried to boot but no luck. So I tried to reset the unit by pressing the reset switch on the left side. Still no joy. Then I tried pressing the rest button while holding down the Shift and Num/Graph keys. And to my joy, the PX-8 sprang into life. Sadly though, this means that the RAM disk has issues.

First things first. We need to get it off the PX-8. This was much harder than I imagined and this should have been a warning sign that something was amiss. There are two large threaded 'collets' that hold the unit to back of the PX-8. I managed to undo the first with some difficulty but then the second just would NOT budge. I tried everything I had; a bit of IPA but no change, WD40 but no change, a gentle but nerve jarring tap or two with the handle of a hefty screwdriver. But nothing would move the fixing at all. Eventually, using a bit of brute strength I managed to twist the unit with the non-attached end swinging around and, after a tear inducing CRACK of plastic, it finally released itself. I had damaged one corner of the RAM Disk but it's not too bad and shouldn't be noticeable once it's re-assembled back onto the PX-8 (with fixings loosely attached!!).

Into the case I went and guess what I saw. A leaky battery. Oh. Shit.

Leaky battery - begone!

At this point I took a slight diversion to also remove the batteries from the PX-8. It involved many screws and much cursing. If it had a screw head, it was undone... 

PX-8 Leaky door - not good

Damaged PX-8 battery connector

Damaged PX-8 motherboard - Gah!

A clean up was made of the PX-8 motherboard which resulted in 'SW3' falling off the board as it was badly damaged. I decided that this PX-8 will not have replacement batteries installed so I could safely bypass the switch so it was always set to "don't keep RAM contents".

Back to the RAM Disk. This particular device is quite clever as it is an 'active' RAM expansion. In a nutshell, it has its own Z80A CPU and associated logic to control the RAM and the interactions between the board and the PX-8. Very clever. The battery was there so that the RAM could be filled and then, with minimal power required, it could keep the RAM contents. 

Given the age and the use that this board will now have, I again decided that no more batteries would be installed into the unit. No biggie but it does mean I'll probably have to 'format' it every time I switch it on. If that becomes an issue I may have to think again but for now, no batteries.

So, how do we find out what's wrong with this little beauty? I'd like to say I deliberated and came up with a carefully considered plan of simple steps to accurately and quickly diagnose the problem. I'd like to say that but really I've been 'scatter gunning' checks and tests at this a bit willy nilly. Here's a summary though:


RAM Chips

These are fairly standard 64Kb x 1 chips from NEC but they have an additional feature. Pin 1, which is not normally connected, has an extra function. These chips can keep their contents using an extra built in refresh function that uses about 50uA per chip. Nice. This obviously requires that a battery is in the unit but in my case, there ain't gonna be no battery. 

Given that they're standard apart from Pin 1 it was time to break out the RAM checker. I've mentioned this in a previous post so I won't dwell on it too much here. I will add that I put sockets on the board for the non-socketed bank of RAM chips (2 banks of 64kb). I assume that one bank was socketed to allow the board to be used as either the 64kb or 128kb variant.

Heath Robinson RAM Tester

Anway, 2 RAM chips failed. Boo!

But did replacing the RAM chips cure the problem?

No.


Z80A Check

This one was easy. I took the Z80A out of the RAM Disk and shoved it into a ZX Spectrum. It booted fine and ran the SmartCard V2 test ROM with no problems. I even booted up a quick game just to be sure. It's not the Z80A.

The trusty Z80A.

Trace Checks

I have been bitten before by a damaged trace that caused nearly two weeks of confusion. It was an Amiga A500 motherboard and, as it happened, one of the data bus traces was broken. I did not intend to repeat that here, so a few hours of trace checking was carried out. Even though some damage had been caused by the leaky battery it seemed to be limited to the solder mask and all the traces are actually OK.

Still no cure then.


Signal Checks

This time I had access to a more substantial oscilloscope and I put it to use looking at how signals were being handled on the board. For the most part, the signals I found were sensible and a reasonable shape. That was until I reached the TC40H245 chip. Nice crisp signals were going in one side but were coming out very odd shapes the other. Could this be the issue?


Was it the 245, with the dodgy signal,
in the library? (No.)


Not sure this looks right...

Fortunately, I had a couple of these exact chips floating around so after a quick desoldering and socket installation I swapped over to another chip.

Annnnnd..... no difference. It's still broken. :(


Chip Tests

So, other than the Z80A there is an EEPROM and gate array on this board. I can't really do much to check either (although I could dump the contents of the EEPROM - another day perhaps) but what I can do is check the other logic chips. I had to get them all off the board but thanks to my desolder station this was not a big problem. 

I ended up with a pile of chips and needed to work out how to test them. Time to get organised!

Ooooh! Get you!

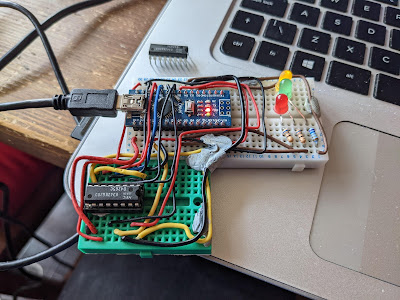
The plan was to wire up each chip and test the various gates and other functions while they were out of circuit. This is where I hit a major snag (and exposed a gap in my knowledge). I wired up a 4069U which is a 'Hex Inverter' so there are six inputs and six outputs, plus a ground and +v pin. Whatever the input is, the corresponding output pin is inverted. So if an input is high ('1') the output will be low ('0'). Or at least, that's the theory. 

When I wired it all up with an LED to indicate the state of the outputs I found I could turn the LED on or off by moving my hands around the chip or by touching the wires. This was completely unexpected and I had to appeal to the Twitterati as to what the heck I was doing wrong. 

In a nutshell, GROUND YOUR INPUTS. I had only connected to one of the gates on the 4069U which left the other input pins floating, causing all sorts of weird and wonderful effects. As soon as I linked all the inputs to ground, the problems went away and I could get on with the testing. 

So from the list, 3C and 13C were fine. But 14C had a problem. This is a TC40H000P which is a quad 2-input NAND gate. This means that there are two inputs per gate and the output is '1' unless both inputs were also '1' in which case the output would be '0'. For two of the four gates the output was '1' no matter what the inputs were. I also noticed a strange 'hot' smell. After utilising my integrated digital temperature scalar unit (my finger) I found that the chip was freakin' hot and clearly up the swanny. Excellent. Or not.


Feeling hot, hot, hot!

13C was the sister chip to 14C and behaved as expected. So did 6C, 4B, 6B and 7C which were also simple logic gates. Nice.

Then came the TC40H074Ps at positions 4C, 12C, 15C and 16C. These are dual 'D' type flip flops and I had to try and work out how to test them. I have worked with flip flops in the dim and distant past but they are but a distant memory.

Eventually I came up with this:

Flip-flop test circuit

So, I put PRE and CLR to high and just left them there, then set 'D' to the input and attached an LED to Q as the output. Every time I toggled '>' (the 'clock' signal') then the setting on 'D' would be copied to the output Q. If '>' was low then no matter how many times I toggled 'D' nothing would happen and Q would remain the same. 

For each of the four dual flip-flop chips I wired them up as above and then did the following:

  • Attach 'D' to 5v
  • Toggle '>'
  • Whatever 'D' was should be on Q so with 'D' at 5v (i.e. high) then the LED should light
  • Attach 'D' to GND
  • Toggle '>'
  • LED should go 'off' as 'D' is at 0v (i.e. low)

Not the most comprehensive of tests but it shows that the basics of the flip-flops are working.

So another four chips tested OK. We are at this point:

Progress!

New 74HC00 chips to replace 14C have arrived and new 14 pin sockets are on the way, so the plan is to install new sockets, the replacement for 14C and see if it that makes any difference.

Stay tuned for an exciting* update soon!

(*this may be stretching the definition of exciting beyond reasonable expectations.)


Tuesday, January 04, 2022

Bits and Bobs

Happy New Year to all my regular readers!

A New Dimension
Father Christmas was very generous this year and brought me a 3D printer, an Ender Creality 3. After using the paltry amount of filament that came with it to 3D print a dog, I got down to the serious business. My awesome sister provided a 1Kg roll of nice black filament which was a good thing.


Dog.


First up, a new cassette counter button for the CPC464. This took about five minutes to print and all was well until I realised that because of the small size of it, I had printed it in the wrong direction. I had 'sliced' it with the model lying flat on the print bed. This meant that the critical part i.e. the tiny thin bit that holds the triangular reset arm, was printed in the weakest way possible and it snapped off while I was looking at it. A quick rotation in the slicer and re-print (now ten minutes) and all was well. It fitted without any problems and even though if you get close you can tell it's a 3D print, it works surprisingly well.


Reset Button - This one broke...


Next. The SmartCard v2 that I have for my Speccy currently has a 3D printed case on it already. But the model used was quite chunky and the case was printed in a resin printer courtesy of my most excellent brother. But, despite the general quality, the two halves did not fit together very well and it was held together with insulating tape. It looks like the original model that I had passed to my brother (lost due to a failed hard disk) is now being charged for on whatever website I got it from. Another, slightly smaller case is available elsewhere and so this is the one I printed. This took a few hours and I did two separate prints, one for each half (I realised later I could've done it in one but there you go). And the results are very, very nice. The case is very straight and the two halves fit together perfectly. I need to glue it since there are no screw holes or other fixings but it really is a very nice crisp case. 


Front Case


Rear Case - Fitted


Front Case - Fitted


Finally, I printed a simple floppy disk cleaner. This is simply a frame that holds the disk and keeps the shutter open, and a knob (no sniggering at the back) to turn the actual disk for cleaning. Very simple and only an hour or so to print both at once.


Frame and knob.


Epson PX8 Update

Monster Drive
I tried to get the monster 5 1/4 inch drive working as mentioned before, and it powers up successfully and does make an effort to read the disks in the drive but I keep getting read errors. I am not sure if this is disks (they're obviously quite old) or the drive needing some attention with cleaning, calibration etc. This will have to wait for another day.


BDOS Error. Dangnabit!


128Kb RAM Disk
I also found that the BASIC ROM with the PX8 doesn't work. I had thought that maybe the chip had become corrupted/faulty but after some shenanigans with a Dataman S4 (see below) I'm wondering if there is actually not enough RAM to run the BASIC. This lead me to investigate the RAM Disk unit which should have 128Kb of 'backed-up' RAM. My RAM tester came the rescue but it did need a bit of a minor modification as the specific RAM chips in this thing have a function on Pin 1 called 'RRFSH' which is active low. This is supposed to be an automatic refresh of the DRAM using minimal power but, with the current wiring on my tester, it just made everything appear as faulty. 


128Kb RAM Disk
Two banks with one in sockets..


Boo! It failed.

So I took the connection from Pin 1 and tied it to 5v. This then allowed the chip to do it's other trick of using the RAS strobe to keep the contents of the RAM alive. 

Yay! It passed!

And after all that, of the eight chips I could remove easily, as they were socketed, two of them are coming out as faulty. Bugger. The RAM Disk does have a jumper to allow me to swap it to a 64Kb unit but then there could also be faulty chips in the other bank of chips but these are soldered in. Another job for another day.


Dead bugs. :(


Dataman S4
My most excellent work colleague also donated a Dataman S4 to me since he has a much later and therefore much more modern version. This particular unit comes complete with two versions of the library, the power adaptor, the original manual and the 'emulator' cable that allows a PROM to be held in memory and the S4 effectively pretends to be a ROM chip. Very, very nice.


But did it work? No. Opening it up it became obvious why. There is a Ni-Cad battery pack in here that has spilled rainbows and unicorns all over the board. No, wait. It's spilled liquid death.


"I am become death, the destroyer of worlds."

Urgh.


Fortunately, a bit of a clean up and reflow of some of the worst looking joints on the caps and chips, along with a decent amount of power put through the battery terminals (this thing won't work just off the mains - it has to have power through the battery) it sprang back into life.

Library 2.93 loaded but
v3.00 is easily available

Driving from my bench supply


I have managed to use the S4 software which works great in Windows 10 (a surprise) and connected up a serial link to use this rather than the rubbery keyboard on the unit itself. So far I have managed to dump the UD80 ROMs (the obscure video adaptor system for the PX8) and also the BASIC ROM. Comparing the BASIC ROM dump from my PX8 with one found online convinced me that the ROM from the PX8 looks OK and that it may be a memory issue. In any case, once I have found a 32Kb EEPROM I shall burn a new version of BASIC to try and prove my theory.


Now driven by a 1A 9v supply
(It's a bit Heath Robinson)


Yay! The software works!


And that's it so far. As you can see, there is a lot for me to get done this year and that does not include anything else that I might stumble upon in eBay or any other donations that may 'appear' in my garage ("Honest Mrs Crashed, I have no idea how these things got here...").


Tuesday, December 21, 2021

Check out the latest laptop...

 ...in my retro collection.

It's an Epson PX-8 and it is, quite frankly, completely awesome. It actually came as part of a 'bundle' of great stuff that was once again donated by the most excellent work colleague. The whole bundle is going to take months to really go through but here's a quick overview of what we've now got with a one word indication of whether I've managed to test it or not. It's all been in storage for a VERY long time so not everything will work out of the gate but that's expected.


Epson PX8 (with accessories)

  • Epson PX8 computer (working - yay!)
  • RAM Disk (not working - boo!)
  • TF15 Dual 5 1/4 Floppy Drive Unit (powers up but does not read disks - BDOS ERROR)
  • P40 Thermal Printer (not tested yet)
  • P80 Printer (not tested yet)
  • Oval Automation serial display adaptor (DS80) and interface box (DS8) - (not tested yet but not sure of compatible monitor - it may output RF though)
  • Many, many cables...

A selection of pictures:


The Epson PX8


P40 and P80 Printers


TF15 Dual Floppy Drive 
with Oval Automation Boxes peeking out from underneath


TF15 without its cover.
It's a mighty beast!


TF15 came with original card transport
protectors!


At least the PX8 works! Here's Wordstar.


Many, many cables...


Psion Organiser (with accessories)

  • Psion Organiser model XP (appears to boot OK)
  • Psion Organiser model Z64 (appears to boot OK)
  • 3 x 16KB Data Paks (not tested)
  • 2 x 32KB Data Paks (not tested)
  • 1 x 64KB Data Pak (not tested)
  • Maths Pack (not tested)
  • Finance Pack (not tested)
  • Formulator (not tested)
  • Data Organiser (not tested)
  • Pocket Spreadsheet (not tested)
  • Autoscribe Plus (not tested)
  • FileMaster (not tested)
  • Serial cables (not tested)


A brace of Psion.


I suspect some of this might be quite rare...


Dataman S4 EEPROM Programmer

  • Programmer Unit (not working - some battery damage, batteries removed)
  • DIP to PLCC Adaptor (not tested)
  • Original Manual & Cables (reads alright :) , cables not tested)


S4 Programmer - lovely!

Ni-Cd Batteries. Not lovely.


Leakier than the leaky bucket of Leaky McLeak
from the town of Leek.


Other Stuff

  • Original CP/M 2.2 disks in 8 inch floppy format with 5 1/4 inch too and an original manual
  • So many CP/M books
  • Misc software including some really, really early Microsoft stuff (c.1983)
  • Various EEPROMS for the PX8 and other systems


SupeCalc. Super!
(8 inch floppy there)


An early Microsoft Thing
(Also 8 inch floppy)


EEPROM City.


So. Much. Stuff. :)


Palm Computer (with accessories)

Not had a chance to look through the box yet!!


So a veritable smorgasbord of delights (or "more boxes of junk filling the garage" - Mrs Crashed). It really is going to keep me going well into 2022!


Merry Christmas and a Happy New Year to all my regular readers!


Thursday, December 09, 2021

Dingdong Pong Throng

Again, eBay is weird. After watching the price of EVERYTHING that is retro gaming or retro computing related absolutely sky-rocket, I still managed to bag a 70's pong clone for four quid.

To be fair, the seller advertised it as 'non-working' and that they'd tried to make it work and it did sort of work but then it decided it wasn't going to work so he wasn't going to spend any more time on it. His loss.

So we have a PrinzTronic Tournament IV something or other. It's a fairly generic pong clone from c.1977 produced for Dixons (a UK high street electrical retailer which is no longer on the high street but Dixons Group owns Currys and the soon to be re-named Carphone Warehouse). It's very silver. And very, very dirty.


Silvery Seventies

Time to get that top off.


There's not much in here...


It's powered by the TI TM1965 pong-on-a-chip chip which is pin compatible with the AY-3-8500 from General Instruments. The bulk of this unit is all the option switches and the game selection switch. And a TV modulator with attached RF cable. RF. Urgh.


The brains of the operation

The power socket is a standard 3.5mm socket which I would normally expect to see as a headphone or mic socket. But it's not out of place in a console of this age and type (looking at you Atari Jr). It's also got quite a bit of corrosion on it from a previously abandoned set of batteries. 


It's not easy being green...

Fortunately, none of this corrosion has made it to the main board. But there is a slight, minor, tiny little issue with the main board. It's got several, what might be described as, hoofin' great cracks in it. Oh dear. This may explain why the previous owner could not get it to work correctly.


Purple arrow - crack in the board
Red arrow - broken solder joint

This is Not Good(R).

So first things first, let's try to get the game selector switch off without causing any more damage. The de-solder station made light work of this and left all the pads in place (almost) which was good. Being from the 70's this is clearly constructed with proper, leaded solder. None of that ridiculous 'lead-free' nonsense here.


Get out o' there!


Next, try to fix the board. The repair here is only intended to try and keep the circuits correctly connected. The cracks are there forever, but I soldered a large pin across the ground plane to try and reduce the stress on the board once it's screwed back into the case. 


Can we fix it? Of course.

One pad did make a (successful) break for freedom and this required the installation of a bodge wire from the appropriate pin of the switch. The rest of the pins should give enough mechanical strength to hold the switch in.

Now this is done, time to test. For that, I needed two things, power and a TV output. I know that this needs 9v since it would have used six 1.5v 'C' batteries. All I had to work out whether the power socket was centre negative, or centre positive. Using my multimeter I checked which terminal on the power socket had continuity to the ground plane and confirmed that it was 'centre negative' just like the Speccy.

For TV, I had to plug it in via RF (urgh), for which I used the 6 inch Sony Trinitron. This was exciting as I had not had to tune it in before, but I managed without having to refer to the manual...


Is this a dagger I see before me? No, it's a telly.


Well, that works then. Note that the bats are missing as I had de-soldered the controllers (such as they are) to allow for easier working on the board. Now I knew it was working, the next job was to improve the picture. This unit has a TV modulator which means that one of the inputs into it is likely to be a composite signal. After a bit of trial and error (mostly error) I worked out which input to the modulator to cut, and which to connect directly to the centre pin of the modulator output. The results are mighty impressive (well, to me anyway) and a vast improvement over RF.


That's better!


Simple composite mod.

So, time to get it all back together. This required me to solder the cables for the 'controllers' back onto the board, juggle all of the cables for said controllers and then feel that I really needed three arms to get everything back into the right place. And then I hit a couple of problems.

1) The right bat would not appear on screen

2) The picture would go weird if anything so much as brushed against the game selector switch.

First job, clean the potentiometer that is the controller. This just needed me to open the case and spray a bit of contact cleaner into the body of the pot and then give it a damn good wiggling backwards and forwards. And this worked - once I soldered the controller back on to the board it re-appeared straight away. I did the same on the other one too since the bat was very jittery on screen. A good spray and wiggle sorted that out too.


Not a lot in these controllers.
DualShock4s they are not.


Next was the game switch problem. I took the board out of the case again and inspected the bottom. I couldn't be sure but it looked as if the solder blobs I had added to the board had broken along the line of the original cracks. Fortunately, the cracks zig zagged across just one track (from the ground plane) so I added another bodge wire.


New bodge wire.

Finally, I cleaned the selector switch in the same way as the controller pots. Spray and a good hard wiggle.

So, second attempt at re-assembly and I, again, wished I had three arms. But I got it back together without the top case and tried it again. This time, both bats appeared and were rock solid, and the game selector switch generated no interference. Every click firmly switched between the game modes with no glitches or stuttering. 

Nice.

After a good clean I re-installed the top case. I should also point out that this machine had a socket on the back for connecting a light gun. I removed this as it is never going to be used - the only CRT I have is the 6 inch Sony - and had already been disconnected from the board anyway. I can live with that.

Another 70's console saved from the e-waste bin. BEEP! BEEP!  BEEP BEEP!