A New Dimension
Father Christmas was very generous this year and brought me a 3D printer, an Ender Creality 3. After using the paltry amount of filament that came with it to 3D print a dog, I got down to the serious business. My awesome sister provided a 1Kg roll of nice black filament which was a good thing.
 |
| Dog. |
First up, a new cassette counter button for the CPC464. This took about five minutes to print and all was well until I realised that because of the small size of it, I had printed it in the wrong direction. I had 'sliced' it with the model lying flat on the print bed. This meant that the critical part i.e. the tiny thin bit that holds the triangular reset arm, was printed in the weakest way possible and it snapped off while I was looking at it. A quick rotation in the slicer and re-print (now ten minutes) and all was well. It fitted without any problems and even though if you get close you can tell it's a 3D print, it works surprisingly well.
 |
| Reset Button - This one broke... |
Next. The SmartCard v2 that I have for my Speccy currently has a 3D printed case on it already. But the model used was quite chunky and the case was printed in a resin printer courtesy of my most excellent brother. But, despite the general quality, the two halves did not fit together very well and it was held together with insulating tape. It looks like the original model that I had passed to my brother (lost due to a failed hard disk) is now being charged for on whatever website I got it from. Another, slightly smaller case is available elsewhere and so this is the one I printed. This took a few hours and I did two separate prints, one for each half (I realised later I could've done it in one but there you go). And the results are very, very nice. The case is very straight and the two halves fit together perfectly. I need to glue it since there are no screw holes or other fixings but it really is a very nice crisp case.
 |
| Front Case |
 |
| Rear Case - Fitted |
 |
| Front Case - Fitted |
Finally, I printed a simple floppy disk cleaner. This is simply a frame that holds the disk and keeps the shutter open, and a knob (no sniggering at the back) to turn the actual disk for cleaning. Very simple and only an hour or so to print both at once.
 |
| Frame and knob. |
Epson PX8 Update
Monster Drive
I tried to get the monster 5 1/4 inch drive working as mentioned before, and it powers up successfully and does make an effort to read the disks in the drive but I keep getting read errors. I am not sure if this is disks (they're obviously quite old) or the drive needing some attention with cleaning, calibration etc. This will have to wait for another day.
 |
| BDOS Error. Dangnabit! |
128Kb RAM Disk
I also found that the BASIC ROM with the PX8 doesn't work. I had thought that maybe the chip had become corrupted/faulty but after some shenanigans with a Dataman S4 (see below) I'm wondering if there is actually not enough RAM to run the BASIC. This lead me to investigate the RAM Disk unit which should have 128Kb of 'backed-up' RAM. My RAM tester came the rescue but it did need a bit of a minor modification as the specific RAM chips in this thing have a function on Pin 1 called 'RRFSH' which is active low. This is supposed to be an automatic refresh of the DRAM using minimal power but, with the current wiring on my tester, it just made everything appear as faulty.
 |
| 128Kb RAM Disk Two banks with one in sockets.. |
 |
| Boo! It failed. |
So I took the connection from Pin 1 and tied it to 5v. This then allowed the chip to do it's other trick of using the RAS strobe to keep the contents of the RAM alive.
 |
| Yay! It passed! |
And after all that, of the eight chips I could remove easily, as they were socketed, two of them are coming out as faulty. Bugger. The RAM Disk does have a jumper to allow me to swap it to a 64Kb unit but then there could also be faulty chips in the other bank of chips but these are soldered in. Another job for another day.
 |
| Dead bugs. :( |
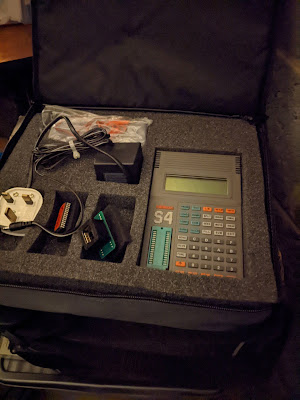
Dataman S4
My most excellent work colleague also donated a Dataman S4 to me since he has a much later and therefore much more modern version. This particular unit comes complete with two versions of the library, the power adaptor, the original manual and the 'emulator' cable that allows a PROM to be held in memory and the S4 effectively pretends to be a ROM chip. Very, very nice.


But did it work? No. Opening it up it became obvious why. There is a Ni-Cad battery pack in here that has spilled rainbows and unicorns all over the board. No, wait. It's spilled liquid death.
 |
| "I am become death, the destroyer of worlds." |
 |
| Urgh. |
Fortunately, a bit of a clean up and reflow of some of the worst looking joints on the caps and chips, along with a decent amount of power put through the battery terminals (this thing won't work just off the mains - it has to have power through the battery) it sprang back into life.
 |
| Library 2.93 loaded but v3.00 is easily available |
 |
| Driving from my bench supply |
I have managed to use the S4 software which works great in Windows 10 (a surprise) and connected up a serial link to use this rather than the rubbery keyboard on the unit itself. So far I have managed to dump the UD80 ROMs (the obscure video adaptor system for the PX8) and also the BASIC ROM. Comparing the BASIC ROM dump from my PX8 with one found online convinced me that the ROM from the PX8 looks OK and that it may be a memory issue. In any case, once I have found a 32Kb EEPROM I shall burn a new version of BASIC to try and prove my theory.
 |
| Now driven by a 1A 9v supply (It's a bit Heath Robinson) |
 |
| Yay! The software works! |
And that's it so far. As you can see, there is a lot for me to get done this year and that does not include anything else that I might stumble upon in eBay or any other donations that may 'appear' in my garage ("Honest Mrs Crashed, I have no idea how these things got here...").